Qt 5.2 Alpha release is now available now, you can download from the Qt Project download area for the open source version and in customer portal for Qt Enterprise users. The packages are source only and mainly for people already used to developing with Qt. Unless you feel comfortable compiling Qt on your own, you might want to wait for the beta which will come out within the next few weeks.
Qt 5.2 is the first Qt release to fully support development of Qt applications for Android and iOS. A lot of work has gone into supporting these two platforms.
With the exception of WebKit, all essential modules are supported in both Android and iOS. This includes all of Qt Core, Qt Network, Qt Gui, Qt Widgets, Qt Qml, Qt Quick and Qt Multimedia. From the Qt add-ons Qt Sensors, Qt Graphical Effects, Qt Script and Qt SVG are supported. On Android a special Qt Android Extras module is also supported.
...and much more from the source: Qt Blog
Monday, September 30, 2013
Saturday, September 28, 2013
Create Qt Quick Application
To new a Qt Quick Application (QtQuick2example), click File -> New File or Project..., select Project of Applications, and Qt Quick 2 Application (Built-in Type); to create a Qt Quick 2 application project that can contain both QML and C++ code and includes a QQuickView. And click Choose... button.
Then enter extra setting, such as Name, Location, in following steps.
Here is the auto generated main.cpp and main.qml.
main.cpp
main.qml
Output:
Then enter extra setting, such as Name, Location, in following steps.
Here is the auto generated main.cpp and main.qml.
main.cpp
#include <QtGui/QGuiApplication>
#include "qtquick2applicationviewer.h"

int main(int argc, char *argv[])
{
    QGuiApplication app(argc, argv);

    QtQuick2ApplicationViewer viewer;
    viewer.setMainQmlFile(QStringLiteral("qml/QtQuick2example/main.qml"));
    viewer.showExpanded();

    return app.exec();
}
main.qml
import QtQuick 2.0

Rectangle {
    width: 360
    height: 360
    Text {
        text: qsTr("Hello World")
        anchors.centerIn: parent
    }
    MouseArea {
        anchors.fill: parent
        onClicked: {
            Qt.quit();
        }
    }
}
Output:
error: GL/gl.h: No such file or directory
If you face the error of "GL/gl.h: No such file or directory" whild building your Qt project, you are missing the OpenGl components.
Refer to the post "cannot find -lGL" to install libgl1-mesa-dev and libglu1-mesa-dev.
Refer to the post "cannot find -lGL" to install libgl1-mesa-dev and libglu1-mesa-dev.
Qt Quick Controls
The Qt Quick Controls module provides a set of controls that can be used to build complete interfaces in Qt Quick.
The module is new in Qt 5.1 and requires Qt Quick 2.1.
Visit the Qt Quick Controls Overview page to get started.
The module is new in Qt 5.1 and requires Qt Quick 2.1.
Visit the Qt Quick Controls Overview page to get started.
Wednesday, September 25, 2013
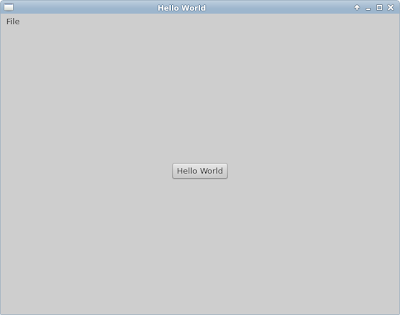
Hello Qt Quick 2 UI with Controls
It's the Qt Creator auto-generated Qt Quick 2 UI with Controls.
 |
| Hello Qt Quick 2 UI with Controls |
import QtQuick 2.1
import QtQuick.Controls 1.0
import QtQuick.Window 2.0

ApplicationWindow {
    title: qsTr("Hello World")
    width: 640
    height: 480

    menuBar: MenuBar {
        Menu {
            title: qsTr("File")
            MenuItem {
                text: qsTr("Exit")
                onTriggered: Qt.quit();
            }
        }
    }

    Button {
        text: qsTr("Hello World")
        anchors.horizontalCenter: parent.horizontalCenter
        anchors.verticalCenter: parent.verticalCenter
    }
}
Monday, September 23, 2013
qml example: TextInput with echoMode
 |
| qml example: TextInput with echoMode |
import QtQuick 2.0

Rectangle {
    width: 360
    height: 360
    Text {
        id: text1
        anchors.top: parent.top
        anchors.topMargin: 5
        text: "Hello World"
    }

    TextInput {
        id: text_default
        anchors.top: text1.bottom
        width: parent.width
        anchors.topMargin: 5
        onAccepted: text1.text = text
    }

    TextInput {
        id: text_Password
        echoMode: TextInput.Password
        anchors.top: text_default.bottom
        width: parent.width
        anchors.topMargin: 5
        onAccepted: text1.text = text
    }

    TextInput {
        id: text_NoEcho
        echoMode: TextInput.NoEcho
        anchors.top: text_Password.bottom
        width: parent.width
        anchors.topMargin: 5
        onAccepted: text1.text = text
    }

    TextInput {
        id: text_PasswordEchoOnEdit
        echoMode: TextInput.PasswordEchoOnEdit
        anchors.top: text_NoEcho.bottom
        width: parent.width
        anchors.topMargin: 5
        onAccepted: text1.text = text
    }

}
Friday, September 20, 2013
Implement qml dialog
 |
| qml dialog |
import QtQuick 2.0

Rectangle {
    id: root
    width: 360
    height: 360

    Rectangle {
        id: myButton

        width: 200
        height: 120
        radius: 25
        anchors.centerIn: parent

        property color buttonColor: "white"
        property color buttonColorPressed: "gray"
        property color buttonBorderColor: "gray"
        property color buttonBorderColorPressed: "black"

        MouseArea{
            id: myButtonMouseArea
            anchors.fill: parent

            onClicked: myDialog.show();
        }

        //gradient color, changed with mouse pressed
        gradient: Gradient {
            GradientStop {
                position: 0.0;
                color: myButtonMouseArea.pressed ? "black" : "gray" }
            GradientStop {
                position: 1.0;
                color: myButtonMouseArea.pressed ? "gray" : "white" }
        }

        border.width: 2
        border.color: myButtonMouseArea.pressed
                      ? buttonBorderColorPressed : buttonBorderColor

        Text{
            id: buttonLabel
            anchors {
                centerIn: parent
                top: parent.top
            }
            color: "black"
            text: "Open Dialog"
        }

    }

    //Dialog
    Rectangle {
         id: myDialog

         property Item text: dialogText

         width: 300
         height: 200
         anchors {
             centerIn: parent
         }
         color: "lightgray"
         border.width: 3

         signal closed
         signal opened
         function forceClose() {
             if(myDialog.opacity != 0){
                 myDialog.closed();
                 myDialog.opacity = 0;
             }
         }

         function show() {
             myDialog.opened();
             myDialog.opacity = 1;
         }

         opacity: 0 //default hide
         visible: opacity > 0
         Behavior on opacity {
             NumberAnimation { duration: 1000 }
         }

         Text {
             anchors.centerIn: parent;
             text: "I'm a Dialog"
         }

         MouseArea {
             anchors.fill: parent;
             onClicked: parent.forceClose();
         }
     }

}
Tuesday, September 17, 2013
Set color interactively with hsla(hue, saturation, lightness, alpha)
The example set background color interactively with hsla(hue, saturation, lightness, alpha).
 |
| qml example: hsla(hue, saturation, lightness, alpha) |
import QtQuick 2.0

Rectangle {
    width: 360
    height: 360
    Text {
        anchors.centerIn: parent
        text: "Hello World"
    }

    /*
        hsla ( real hue, real saturation, real lightness, real alpha )
        Returns a color with the specified hue, saturation, lightness
        and alpha components. All components should be in the range 0-1
        inclusive.
    */
    color: Qt.hsla(
               mySliderHandleHue.x/(mySliderHandleHue.parent.width - 30),
               mySliderHandleSaturation.x/(mySliderHandleSaturation.parent.width - 30),
               mySliderHandleLightness.x/(mySliderHandleLightness.parent.width - 30),
               1)

    Rectangle {
        id: mySliderLightness

        anchors {
            left: parent.left
            right: parent.right
            bottom: parent.bottom
            leftMargin: 20
            rightMargin: 20
            bottomMargin: 10
        }

        height: 20
        radius: 10
        smooth: true
        gradient: Gradient {
            GradientStop { position: 0.0; color: "white" }
            GradientStop { position: 1.0; color: "gray" }
        }

        Rectangle {
            id: mySliderHandleLightness
            x: 1; y: 1; width: 30; height: 20
            radius: 10
            smooth: true
            color: Qt.hsla(0, 0, 1, 1)

            MouseArea {
                anchors.fill: parent
                drag.target: parent
                drag.axis: Drag.XAxis
                drag.minimumX: 0
                drag.maximumX: parent.parent.width - 30
            }
        }
    }

    Rectangle {
        id: mySliderSaturation

        anchors {
            left: parent.left
            right: parent.right
            bottom: mySliderLightness.top
            leftMargin: 20
            rightMargin: 20
            bottomMargin: 10
        }

        height: 20
        radius: 10
        smooth: true
        gradient: Gradient {
            GradientStop { position: 0.0; color: "white" }
            GradientStop { position: 1.0; color: "gray" }
        }

        Rectangle {
            id: mySliderHandleSaturation
            x: 1; y: 1; width: 30; height: 20
            radius: 10
            smooth: true
            color: Qt.hsla(0, 1, 0, 1)

            MouseArea {
                anchors.fill: parent
                drag.target: parent
                drag.axis: Drag.XAxis
                drag.minimumX: 0
                drag.maximumX: parent.parent.width - 30
            }
        }
    }

    Rectangle {
        id: mySliderHue

        anchors {
            left: parent.left
            right: parent.right
            bottom: mySliderSaturation.top
            leftMargin: 20
            rightMargin: 20
            bottomMargin: 10
        }

        height: 20
        radius: 10
        smooth: true
        gradient: Gradient {
            GradientStop { position: 0.0; color: "white" }
            GradientStop { position: 1.0; color: "gray" }
        }

        Rectangle {
            id: mySliderHandleHue
            x: 1; y: 1; width: 30; height: 20
            radius: 10
            smooth: true
            color: Qt.hsla(1, 0, 0, 1)

            MouseArea {
                anchors.fill: parent
                drag.target: parent
                drag.axis: Drag.XAxis
                drag.minimumX: 0
                drag.maximumX: parent.parent.width - 30
            }
        }
    }
}
Set color interactively with rgba(red, green, blue, alpha)
The example set background color interactively with rgba(red, green, blue, alpha).
 |
| qml example: rgba(red, green, blue, alpha) |
import QtQuick 2.0

Rectangle {
    width: 360
    height: 360
    Text {
        anchors.centerIn: parent
        text: "Hello World"
    }

    /*
        rgba( real red, real green, real blue, real alpha )
        Returns a color with the specified red, green, blue and alpha
        components. All components should be in the range 0-1 inclusive.
    */
    color: Qt.rgba(
               mySliderHandleRed.x/(mySliderHandleRed.parent.width - 30),
               mySliderHandleGreen.x/(mySliderHandleGreen.parent.width - 30),
               mySliderHandleBlue.x/(mySliderHandleBlue.parent.width - 30),
               1)

    Rectangle {
        id: mySliderBlue

        anchors {
            left: parent.left
            right: parent.right
            bottom: parent.bottom
            leftMargin: 20
            rightMargin: 20
            bottomMargin: 10
        }

        height: 20
        radius: 10
        smooth: true
        gradient: Gradient {
            GradientStop { position: 0.0; color: "white" }
            GradientStop { position: 1.0; color: "gray" }
        }

        Rectangle {
            id: mySliderHandleBlue
            x: 1; y: 1; width: 30; height: 20
            radius: 10
            smooth: true
            color: "blue"

            MouseArea {
                anchors.fill: parent
                drag.target: parent
                drag.axis: Drag.XAxis
                drag.minimumX: 0
                drag.maximumX: parent.parent.width - 30
            }
        }
    }

    Rectangle {
        id: mySliderGreen

        anchors {
            left: parent.left
            right: parent.right
            bottom: mySliderBlue.top
            leftMargin: 20
            rightMargin: 20
            bottomMargin: 10
        }

        height: 20
        radius: 10
        smooth: true
        gradient: Gradient {
            GradientStop { position: 0.0; color: "white" }
            GradientStop { position: 1.0; color: "gray" }
        }

        Rectangle {
            id: mySliderHandleGreen
            x: 1; y: 1; width: 30; height: 20
            radius: 10
            smooth: true
            color: "green"

            MouseArea {
                anchors.fill: parent
                drag.target: parent
                drag.axis: Drag.XAxis
                drag.minimumX: 0
                drag.maximumX: parent.parent.width - 30
            }
        }
    }

    Rectangle {
        id: mySliderRed

        anchors {
            left: parent.left
            right: parent.right
            bottom: mySliderGreen.top
            leftMargin: 20
            rightMargin: 20
            bottomMargin: 10
        }

        height: 20
        radius: 10
        smooth: true
        gradient: Gradient {
            GradientStop { position: 0.0; color: "white" }
            GradientStop { position: 1.0; color: "gray" }
        }

        Rectangle {
            id: mySliderHandleRed
            x: 1; y: 1; width: 30; height: 20
            radius: 10
            smooth: true
            color: "red"

            MouseArea {
                anchors.fill: parent
                drag.target: parent
                drag.axis: Drag.XAxis
                drag.minimumX: 0
                drag.maximumX: parent.parent.width - 30
            }
        }
    }
}
Thursday, September 5, 2013
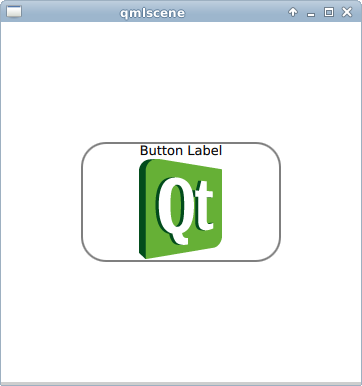
qml example: make gradient color
Example to make gradient color on button.
qml button step-by-step
 |
| make gradient color on button |
import QtQuick 2.0

Rectangle {
    width: 360
    height: 360

    Rectangle {
        id: myButton

        width: 200
        height: 120
        radius: 25
        anchors.centerIn: parent

        property color buttonColor: "white"
        property color buttonColorPressed: "gray"
        property color buttonBorderColor: "gray"
        property color buttonBorderColorPressed: "black"

        signal signalMe(string action)
        onSignalMe: console.log(action)

        MouseArea{
            id: myButtonMouseArea
            anchors.fill: parent

            onClicked: myButton.signalMe("Clicked")
            onPressed: myButton.signalMe("Pressed")
            onReleased: myButton.signalMe("Released")
        }

        /* pure color, change with mouse pressed
        color: myButtonMouseArea.pressed
               ? buttonColorPressed : buttonColor
        */

        /* gradient color, no change with mouse pressed
        gradient: Gradient {
            GradientStop { position: 0.0; color: "black" }
            GradientStop { position: 1.0; color: "gray" }
        }*/

        //gradient color, changed with mouse pressed
        gradient: Gradient {
            GradientStop {
                position: 0.0;
                color: myButtonMouseArea.pressed ? "black" : "gray" }
            GradientStop {
                position: 1.0;
                color: myButtonMouseArea.pressed ? "gray" : "white" }
        }

        border.width: 2
        border.color: myButtonMouseArea.pressed
                      ? buttonBorderColorPressed : buttonBorderColor

        Text{
            id: buttonLabel
            anchors {
                horizontalCenter: parent.horizontalCenter
                top: parent.top
            }
            color: "black"
            text: "Button Label"
        }

        Image {
            id: buttonImage
            source: "http://goo.gl/kdbgF8"
            anchors {
                horizontalCenter: parent.horizontalCenter
                top: buttonLabel.bottom
            }
        }
    }
}
qml button step-by-step
qml example: Created rounded Rectangle with radius
Use radius: xx to make rounded Rectangle.
example:
qml button step-by-step
example:
 |
| qml example: Created rounded Rectangle with radius |
import QtQuick 2.0

Rectangle {
    width: 360
    height: 360

    Rectangle {
        id: myButton

        width: 200
        height: 120
        radius: 25
        anchors.centerIn: parent

        property color buttonColor: "white"
        property color buttonColorPressed: "gray"
        property color buttonBorderColor: "gray"
        property color buttonBorderColorPressed: "black"

        signal signalMe(string action)
        onSignalMe: console.log(action)

        MouseArea{
            id: myButtonMouseArea
            anchors.fill: parent

            onClicked: myButton.signalMe("Clicked")
            onPressed: myButton.signalMe("Pressed")
            onReleased: myButton.signalMe("Released")
        }

        color: myButtonMouseArea.pressed
               ? buttonColorPressed : buttonColor

        border.width: 2
        border.color: myButtonMouseArea.pressed
                      ? buttonBorderColorPressed : buttonBorderColor

        Text{
            id: buttonLabel
            anchors {
                horizontalCenter: parent.horizontalCenter
                top: parent.top
            }
            color: "black"
            text: "Button Label"
        }

        Image {
            id: buttonImage
            source: "http://goo.gl/kdbgF8"
            anchors {
                horizontalCenter: parent.horizontalCenter
                top: buttonLabel.bottom
            }
        }
    }
}
qml button step-by-step
Wednesday, September 4, 2013
qml example: implement custom signal and signal handler
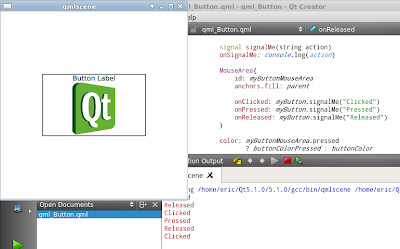
In last qml example of "handle events for button", the MouseArea emit a clicked signal when the user clicks within the mouse area, and then the onClicked signal handler, declared within the MouseArea, will be invoked.
In this post we will create our own signal (signalMe) and signal handler (onSignalMe) to do something.
An object can be notified through a signal handler whenever it a particular signal is emitted. A signal handler is declared with the syntax on<signal> where <signal> is the name of the signal, with the first letter capitalized. The signal handler must be declared within the definition of the object that emits the signal, and the handler should contain the block of JavaScript code to be executed when the signal handler is invoked. ~ refer QML Object Attributes.
qml button step-by-step
In this post we will create our own signal (signalMe) and signal handler (onSignalMe) to do something.
An object can be notified through a signal handler whenever it a particular signal is emitted. A signal handler is declared with the syntax on<signal> where <signal> is the name of the signal, with the first letter capitalized. The signal handler must be declared within the definition of the object that emits the signal, and the handler should contain the block of JavaScript code to be executed when the signal handler is invoked. ~ refer QML Object Attributes.
 |
| implement custom signal and signal handler |
import QtQuick 2.0

Rectangle {
    width: 360
    height: 360

    Rectangle {
        id: myButton

        width: 200
        height: 120
        anchors.centerIn: parent

        property color buttonColor: "white"
        property color buttonColorPressed: "gray"
        property color buttonBorderColor: "gray"
        property color buttonBorderColorPressed: "black"

        signal signalMe(string action)
        onSignalMe: console.log(action)

        MouseArea{
            id: myButtonMouseArea
            anchors.fill: parent

            onClicked: myButton.signalMe("Clicked")
            onPressed: myButton.signalMe("Pressed")
            onReleased: myButton.signalMe("Released")
        }

        color: myButtonMouseArea.pressed
               ? buttonColorPressed : buttonColor

        border.width: 2
        border.color: myButtonMouseArea.pressed
                      ? buttonBorderColorPressed : buttonBorderColor

        Text{
            id: buttonLabel
            anchors {
                horizontalCenter: parent.horizontalCenter
                top: parent.top
            }
            color: "black"
            text: "Button Label"
        }

        Image {
            id: buttonImage
            source: "http://goo.gl/kdbgF8"
            anchors {
                horizontalCenter: parent.horizontalCenter
                top: buttonLabel.bottom
            }
        }
    }
}
qml button step-by-step
Tuesday, September 3, 2013
qml example: handle events for button
 |
| qml example: handle events for button |
To handle events on button, simple handle onClicked:, onPressed:, onReleased:... inside MouseArea.
import QtQuick 2.0

Rectangle {
    width: 360
    height: 360

    Rectangle {
        id: myButton

        width: 200
        height: 120
        anchors.centerIn: parent

        property color buttonColor: "white"
        property color buttonColorPressed: "gray"
        property color buttonBorderColor: "gray"
        property color buttonBorderColorPressed: "black"

        MouseArea{
            id: myButtonMouseArea
            anchors.fill: parent

            onClicked: console.log("Button Clicked")
            onPressed: console.log("Button Pressed")
            onReleased: console.log("Button Released")
        }

        color: myButtonMouseArea.pressed
               ? buttonColorPressed : buttonColor

        border.width: 2
        border.color: myButtonMouseArea.pressed
                      ? buttonBorderColorPressed : buttonBorderColor

        Text{
            id: buttonLabel
            anchors {
                horizontalCenter: parent.horizontalCenter
                top: parent.top
            }
            color: "black"
            text: "Button Label"
        }

        Image {
            id: buttonImage
            source: "http://goo.gl/kdbgF8"
            anchors {
                horizontalCenter: parent.horizontalCenter
                top: buttonLabel.bottom
            }
        }
    }
}
In this example, the MouseArea will emit a clicked signal when the user clicks within the mouse area, and then the onClicked signal handler, declared within the MouseArea, will be invoked.
qml button step-by-step
qml example: add image on button
 |
| qml example: add image on button |
import QtQuick 2.0

Rectangle {
    width: 360
    height: 360

    Rectangle {
        id: myButton

        width: 200
        height: 120
        anchors.centerIn: parent

        property color buttonColor: "white"
        property color buttonColorPressed: "gray"
        property color buttonBorderColor: "gray"
        property color buttonBorderColorPressed: "black"

        MouseArea{
            id: myButtonMouseArea
            anchors.fill: parent
        }

        color: myButtonMouseArea.pressed
               ? buttonColorPressed : buttonColor

        border.width: 2
        border.color: myButtonMouseArea.pressed
                      ? buttonBorderColorPressed : buttonBorderColor

        Text{
            id: buttonLabel
            anchors {
                horizontalCenter: parent.horizontalCenter
                top: parent.top
            }
            color: "black"
            text: "Button Label"
        }

        Image {
            id: buttonImage
            source: "http://goo.gl/kdbgF8"
            anchors {
                horizontalCenter: parent.horizontalCenter
                top: buttonLabel.bottom
            }
        }
    }
}
qml button step-by-step
qml example: add label to button
Label can be added to button as text.
qml button step-by-step
 |
| qml example: add label to button |
import QtQuick 2.0

Rectangle {
    width: 360
    height: 360

    Rectangle {
        id: myButton

        width: 100
        height: 50
        anchors.centerIn: parent

        property color buttonColor: "white"
        property color buttonColorPressed: "gray"
        property color buttonBorderColor: "gray"
        property color buttonBorderColorPressed: "black"


        MouseArea{
            id: myButtonMouseArea
            anchors.fill: parent
        }

        color: myButtonMouseArea.pressed
               ? buttonColorPressed : buttonColor

        border.width: 2
        border.color: myButtonMouseArea.pressed
                      ? buttonBorderColorPressed : buttonBorderColor

        Text{
            id: buttonLabel
            anchors.centerIn: parent
            color: "black"
            text: "Button Label"
        }
    }
}
qml button step-by-step
Sunday, September 1, 2013
qml example: simple button
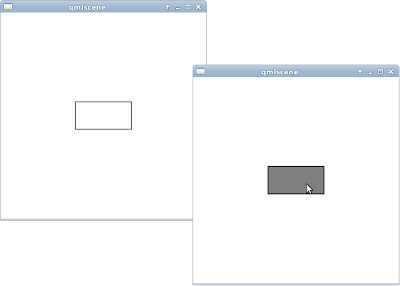
 |
| qml example: simple button |
import QtQuick 2.0

Rectangle {
    width: 360
    height: 360

    Rectangle {
        id: myButton

        width: 100
        height: 50
        anchors.centerIn: parent

        property color buttonColor: "white"
        property color buttonColorPressed: "gray"
        property color buttonBorderColor: "gray"
        property color buttonBorderColorPressed: "black"


        MouseArea{
            id: myButtonMouseArea
            anchors.fill: parent
        }

        color: myButtonMouseArea.pressed
               ? buttonColorPressed : buttonColor

        border.width: 2
        border.color: myButtonMouseArea.pressed
                      ? buttonBorderColorPressed : buttonBorderColor
    }
}
more: Implement qml button step-by-step
- add label to button
- add image on button
- handle events for button
- implement custom signal and signal handler
- created rounded Rectangle with radius
- make gradient color
Subscribe to:
Comments (Atom)
Labels
Dev. tools
(13)
how to
(10)
Internet of Things (IoT)
(1)
learn Qt
(1)
misc
(1)
misc.
(1)
mobile
(2)
news
(6)
OpenCV
(1)
OpenGL
(1)
QML
(1)
qml example
(40)
Qt
(2)
Qt Cloud
(1)
Qt Creator
(3)
Qt Creator Examples
(4)
Qt Enterprise Embedded
(1)
Qt Examples
(1)
Qt for Android
(5)
Qt for iOS
(2)
Qt for MCU
(1)
Qt news
(1)
Qt Quick
(3)
Qt Quick Control
(1)
Qt Quick Designer
(2)
QtQuick example
(14)
QtQuick.Controls examples
(13)
Ubuntu SDK
(1)
VirtualBox
(1)
WebEngine
(1)

