Showing posts with label qml example. Show all posts

Tuesday, October 15, 2013

QtQuick example: resizing Window

QtQuick example: resizing Window


import QtQuick 2.1
import QtQuick.Controls 1.0
import QtQuick.Window 2.0

ApplicationWindow {
    title: "Qteveloper (http://qteveloper.blogspot.com/)"
    width: 400
    height: 380

    menuBar: MenuBar {
        Menu {
            title: "Sub-Window"
            MenuItem {
                text: "Open"
                onTriggered: myWindow.open();
            }
            MenuItem {
                text: "Close"
                onTriggered: myWindow.close();
            }
        }
    }

    Window{
        id: myWindow
        title: "Child Window"
        width: 300
        height: 300
        visible: false
        function open(){
            visible = true
        }
        function close(){
            visible = false
        }

        Rectangle {
            anchors.fill: parent

            Button {
                id: maxMe
                anchors.horizontalCenter: parent.horizontalCenter
                anchors.top: parent.top
                text:"Maximize me"
                width: parent.width
                tooltip:"Maximize this child window"
                onClicked: myWindow.showMaximized()
            }
            Button {
                id: normalizeMe
                anchors.horizontalCenter: parent.horizontalCenter
                anchors.top: maxMe.bottom
                text:"Normalize me"
                width: parent.width
                tooltip:"Normalize this child window"
                onClicked: myWindow.showNormal()
            }
            Button {
                id: minMe
                anchors.horizontalCenter: parent.horizontalCenter
                anchors.top: normalizeMe.bottom
                text:"Minimized...but not work as expected!"
                width: parent.width
                tooltip:"Minimized this child window"
                onClicked: myWindow.showMinimized()
            }
            Button {
                id: closeMe
                anchors.horizontalCenter: parent.horizontalCenter
                anchors.bottom: parent.bottom
                text:"Close me"
                width: parent.width
                tooltip:"Close this child Window"
                onClicked: myWindow.close()
            }
        }
    }
}


Tuesday, October 8, 2013

QtQuick example: Image

Example to use Image:

QtQuick example: Image


import QtQuick 2.1
import QtQuick.Controls 1.0

ApplicationWindow {
    title: "Qteveloper (http://qteveloper.blogspot.com/)"
    width: 420
    height: 380

    menuBar: MenuBar {
        Menu {
            title: "Load Image"
            MenuItem {
                text: "image1"
                onTriggered: myImage.source = "http://goo.gl/kdbgF8"
            }
            MenuItem {
                text: "image2"
                onTriggered: myImage.source = "http://goo.gl/6n8lX7"
            }
            MenuItem {
                text: "no image"
                onTriggered: myImage.source = ""
            }
        }
    }

    Image{
        id: myImage
        anchors.centerIn: parent
        source: "http://goo.gl/kdbgF8"
    }

}


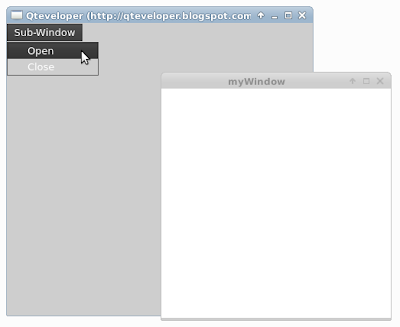
QtQuick example: open and close new Window

QtQuick example: open and close new Window


import QtQuick 2.1
import QtQuick.Controls 1.0
import QtQuick.Window 2.0

ApplicationWindow {
    title: "Qteveloper (http://qteveloper.blogspot.com/)"
    width: 400
    height: 380

    menuBar: MenuBar {
        Menu {
            title: "Sub-Window"
            MenuItem {
                text: "Open"
                onTriggered: myWindow.open();
            }
            MenuItem {
                text: "Close"
                onTriggered: myWindow.close();
            }
        }
    }

    Window{
        id: myWindow
        title: "myWindow"
        width: 300
        height: 300
        visible: false
        function open(){
            visible = true
        }
        function close(){
            visible = false
        }
    }
}


Sunday, October 6, 2013

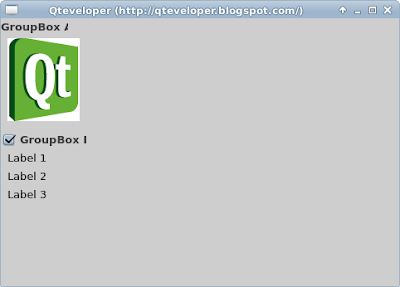
QtQuick Controls example: GroupBox

GroupBox provides a frame, a title on top and displays various other controls inside itself. Group boxes can also be checkable.

GroupBox example
GroupBox example


import QtQuick 2.1
import QtQuick.Controls 1.0
import QtQuick.Window 2.0
import QtQuick.Layouts 1.0

ApplicationWindow {
    title: "Qteveloper (http://qteveloper.blogspot.com/)"
    width: 480
    height: 320

    ColumnLayout{

        GroupBox {
            id: groupBoxA
            title: "GroupBox A"
            Layout.fillWidth: true
            Image {
                source: "http://goo.gl/kdbgF8"
            }
        }

        GroupBox {
            id: groupBoxB
            title: "GroupBox B"
            Layout.fillWidth: true
            checkable: true

            ColumnLayout {
                anchors.fill: parent
                Label { text: "Label 1" }
                Label { text: "Label 2" }
                Label { text: "Label 3" }
            }
        }

    }

}


Saturday, October 5, 2013

QtQuick Controls: SplitView


import QtQuick 2.1
import QtQuick.Controls 1.0
import QtQuick.Window 2.0
import QtQuick.Layouts 1.0

ApplicationWindow {
    title: qsTr("Hello World")
    width: 640
    height: 480

    SplitView{
        anchors.fill: parent
        orientation: Qt.Horizontal

        Rectangle{
            width: 100
            Layout.minimumWidth: 200
            Image {
                width: 500
                height: 250
                source: "http://goo.gl/ZfY4AM"
            }
        }

        Rectangle{
            Layout.minimumWidth: 50
            Image {
                source: "http://goo.gl/ZfY4AM"
            }
        }
    }
}


Related: QtQuick Controls: ScrollView

Friday, October 4, 2013

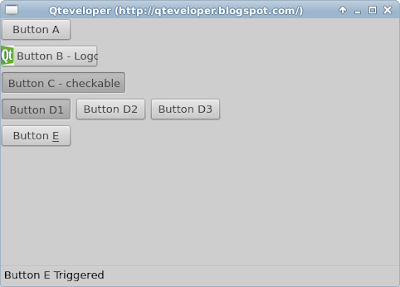
QtQuick Controls: Apply Action to Buttons

QtQuick Controls: Apply Action to Buttons


import QtQuick 2.1
import QtQuick.Controls 1.0
import QtQuick.Window 2.0
import QtQuick.Layouts 1.0

ApplicationWindow {
    title: "Qteveloper (http://qteveloper.blogspot.com/)"
    width: 480
    height: 320

    ColumnLayout{

        Button { action: actionButtonA }
        Button { action: actionButtonB }
        Button { action: actionButtonC }

        RowLayout{
            Button { action: actionButtonD1 }
            Button { action: actionButtonD2 }
            Button { action: actionButtonD3 }
        }
        Button { action: actionButtonE }
    }

    Action{
        id: actionButtonA
        text: "Button A"
        onTriggered: statusLabel.text = "Button A Triggered "
    }

    Action{
        id: actionButtonB
        text: "Button B - Logo"
        iconSource: "qtlogo.png"
        onTriggered: statusLabel.text = "Button B Triggered "
    }

    Action{
        id: actionButtonC
        text: "Button C - checkable"
        checkable: true
        onCheckedChanged: statusLabel.text = "Button C checked: " + checked
    }

    ExclusiveGroup {
        id: group_D

        Action{
            id: actionButtonD1
            text: "Button D1"
            checkable: true
            onCheckedChanged: {
                if(checked){
                    statusLabel.text = "Button D1 checked"
                }
            }
        }

        Action{
            id: actionButtonD2
            text: "Button D2"
            checkable: true
            onCheckedChanged: {
                if(checked){
                    statusLabel.text = "Button D2 checked"
                }
            }
        }

        Action{
            id: actionButtonD3
            text: "Button D3"
            checkable: true
            onCheckedChanged: {
                if(checked){
                    statusLabel.text = "Button D3 checked"
                }
            }
        }

        Action{
            id: actionButtonE
            text: "Button &E"
            shortcut: "Ctrl+E"
            onTriggered: statusLabel.text = "Button E Triggered "
        }
    }

    statusBar: StatusBar{
        RowLayout{
            Label{
                id: statusLabel
                text: "Status Bar"
            }
        }
    }
}


Related: QtQuick Controls: Example to apply Action to MenuItem and ToolButton

Thursday, October 3, 2013

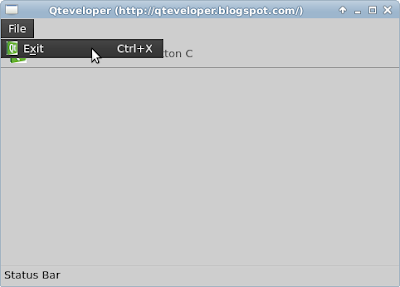
QtQuick Controls: Example to apply Action to MenuItem and ToolButton

Example to apply Action to MenuItem and ToolButton


import QtQuick 2.1
import QtQuick.Controls 1.0
import QtQuick.Window 2.0
import QtQuick.Layouts 1.0

ApplicationWindow {
    id: myWindow
    title: "Qteveloper (http://qteveloper.blogspot.com/)"
    width: 480
    height: 320

    menuBar: MenuBar {
        Menu {
            title: qsTr("File")
            MenuItem {
                action: actionExit
            }
        }
    }

    toolBar: ToolBar{
        RowLayout{
            ToolButton{ action: actionToolButtonA }
            ToolButton{ action: actionToolButtonB }
            ToolButton{ action: actionToolButtonC }
        }
    }

    Action{
        id: actionExit
        text: "E&xit"
        shortcut: "Ctrl+X"
        iconSource: "qtlogo.png"
        onTriggered: Qt.quit()
    }

    Action{
        id: actionToolButtonA
        text: "ToolButton A"
        onTriggered: statusLabel.text = "ToolButton A Triggered "
        iconSource: "qtlogo.png"
    }

    Action{
        id: actionToolButtonB
        text: "ToolButton B"
        checkable: true
        onCheckedChanged: statusLabel.text = "ToolButton B Checked - "
                          + checked
    }

    Action{
        id: actionToolButtonC
        text: "ToolButton C"
        checkable: true
        onCheckedChanged: statusLabel.text = "ToolButton C Checked - "
                          + checked
    }

    statusBar: StatusBar{
        RowLayout{
            Label{
                id: statusLabel
                text: "Status Bar"
            }
        }
    }
}


Related: QtQuick Controls: Apply Action to Buttons

Wednesday, October 2, 2013

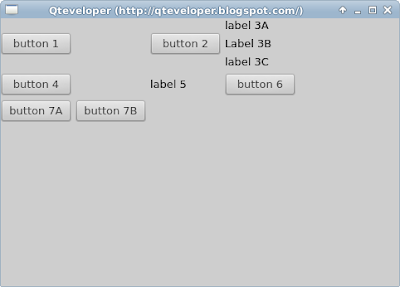
QtQuick.Layouts: GridLayout

GridLayout
QtQuick.Layouts: GridLayout


import QtQuick 2.1
import QtQuick.Controls 1.0
import QtQuick.Window 2.0
import QtQuick.Layouts 1.0

ApplicationWindow {
    id: myWindow
    title: "Qteveloper (http://qteveloper.blogspot.com/)"
    width: 480
    height: 320

    GridLayout{
        columns: 3
        Button { text: "button 1"}
        Button { text: "button 2"}
        ColumnLayout{
            Label { text: "label 3A"}
            Label { text: "Label 3B"}
            Label { text: "label 3C"}
        }
        Button { text: "button 4"}
        Label{ text: "label 5"}
        Button { text: "button 6"}
        RowLayout{
            Button { text: "button 7A"}
            Button { text: "button 7B"}
        }
    }
}


Tuesday, October 1, 2013

QtQuick.Layouts: ColumnLayout

ColumnLayout
QtQuick.Layouts: ColumnLayout


import QtQuick 2.1
import QtQuick.Controls 1.0
import QtQuick.Window 2.0
import QtQuick.Layouts 1.0

ApplicationWindow {
    id: myWindow
    title: "Qteveloper (http://qteveloper.blogspot.com/)"
    width: 480
    height: 320


    ColumnLayout{
        Button { text: "button 1"}
        Button { text: "button 2"}
        ColumnLayout{
            Label { text: "label 3A"}
            Label { text: "Label 3B"}
            Label { text: "label 3C"}
        }
        Button { text: "button 4"}
    }
}


QtQuick.Layouts: RowLayout

RowLayout
QtQuick.Layouts: RowLayout


import QtQuick 2.1
import QtQuick.Controls 1.0
import QtQuick.Window 2.0
import QtQuick.Layouts 1.0

ApplicationWindow {
    id: myWindow
    title: "Qteveloper (http://qteveloper.blogspot.com/)"
    width: 480
    height: 320


    RowLayout{
        Button { text: "button 1"}
        Button { text: "button 2"}
        RowLayout{
            Label { text: "label 3A"}
            Label { text: "Label 3B"}
            Label { text: "label 3C"}
        }
        Button { text: "button 4"}
    }
}


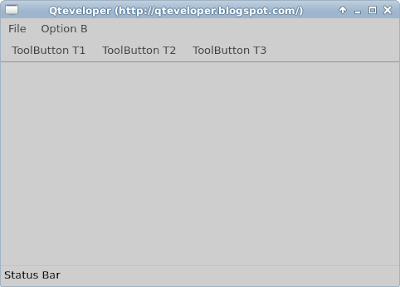
QtQuick Controls: ApplicationWindow, MenuBar, ToolBar and StatusBar

ApplicationWindow, MenuBar, ToolBar and StatusBar
QtQuick Controls: ApplicationWindow, MenuBar, ToolBar and StatusBar

import QtQuick 2.1
import QtQuick.Controls 1.0
import QtQuick.Window 2.0
import QtQuick.Layouts 1.0

ApplicationWindow {
    id: myWindow
    title: "Qteveloper (http://qteveloper.blogspot.com/)"
    width: 480
    height: 320


    menuBar: MenuBar {
        Menu {
            title: qsTr("File")
            MenuItem {
                text: qsTr("Exit")
                onTriggered: Qt.quit();
            }
            MenuItem {
                text: "File - Item 2"
                onTriggered: statusLabel.text = "File - Item 2 Triggered"
            }
        }
        Menu {
            title: "Option B"
            MenuItem {
                text: "Opt B1"
                onTriggered: statusLabel.text = "Opt B1 Triggered"

            }
            MenuItem {
                text: "Opt B2"
                checkable: true
                onCheckedChanged: statusLabel.text = "Opt B2 Checked - "
                                  + checked
            }
            MenuItem {
                text: "Opt B3"
                checkable: true
                onCheckedChanged: statusLabel.text = "Opt B3 Checked - "
                                  + checked
            }
        }
    }

    toolBar: ToolBar{
        RowLayout{
            ToolButton{
                text: "ToolButton T1"
                onClicked: statusLabel.text = "ToolButton T1 clicked"
            }
            ToolButton{
                text: "ToolButton T2"
                onClicked: statusLabel.text = "ToolButton T2 clicked"
            }
            ToolButton{
                text: "ToolButton T3"
                onClicked: statusLabel.text = "ToolButton T3 clicked"
            }
        }
    }

    statusBar: StatusBar{
        RowLayout{
            Label{
                id: statusLabel
                text: "Status Bar"
            }
        }
    }
}


~ QtQuick Controls: Example to apply Action to MenuItem and ToolButton

QtQuick Controls: ScrollView

Example of using ScrollView in QtQuick.Controls 1.0.

There are two Images in the window, both loaded from the same source at internet. The upper one place within a ScrollView, the bottom one is a standalone image.

QtQuick Controls: ScrollView

import QtQuick 2.1
import QtQuick.Controls 1.0

Rectangle {
    width: 500
    height: 500

    //Image within ScrollView
    ScrollView{
        id: myScrollView
        anchors.top: parent.top
        width: 500
        height: 250
        Image {
            source: "http://goo.gl/ZfY4AM"
        }
    }

    //standalone Image
    Image {
        anchors.top: myScrollView.bottom
        width: 500
        height: 250
        source: "http://goo.gl/ZfY4AM"
    }
}


Related: QtQuick Controls: SplitView

Monday, September 23, 2013

qml example: TextInput with echoMode

qml example: TextInput with echoMode

import QtQuick 2.0

Rectangle {
    width: 360
    height: 360
    Text {
        id: text1
        anchors.top: parent.top
        anchors.topMargin: 5
        text: "Hello World"
    }

    TextInput {
        id: text_default
        anchors.top: text1.bottom
        width: parent.width
        anchors.topMargin: 5
        onAccepted: text1.text = text
    }

    TextInput {
        id: text_Password
        echoMode: TextInput.Password
        anchors.top: text_default.bottom
        width: parent.width
        anchors.topMargin: 5
        onAccepted: text1.text = text
    }

    TextInput {
        id: text_NoEcho
        echoMode: TextInput.NoEcho
        anchors.top: text_Password.bottom
        width: parent.width
        anchors.topMargin: 5
        onAccepted: text1.text = text
    }

    TextInput {
        id: text_PasswordEchoOnEdit
        echoMode: TextInput.PasswordEchoOnEdit
        anchors.top: text_NoEcho.bottom
        width: parent.width
        anchors.topMargin: 5
        onAccepted: text1.text = text
    }

}

Friday, September 20, 2013

Implement qml dialog

qml dialog
qml dialog

import QtQuick 2.0

Rectangle {
    id: root
    width: 360
    height: 360

    Rectangle {
        id: myButton

        width: 200
        height: 120
        radius: 25
        anchors.centerIn: parent

        property color buttonColor: "white"
        property color buttonColorPressed: "gray"
        property color buttonBorderColor: "gray"
        property color buttonBorderColorPressed: "black"

        MouseArea{
            id: myButtonMouseArea
            anchors.fill: parent

            onClicked: myDialog.show();
        }

        //gradient color, changed with mouse pressed
        gradient: Gradient {
            GradientStop {
                position: 0.0;
                color: myButtonMouseArea.pressed ? "black" : "gray" }
            GradientStop {
                position: 1.0;
                color: myButtonMouseArea.pressed ? "gray" : "white" }
        }

        border.width: 2
        border.color: myButtonMouseArea.pressed
                      ? buttonBorderColorPressed : buttonBorderColor

        Text{
            id: buttonLabel
            anchors {
                centerIn: parent
                top: parent.top
            }
            color: "black"
            text: "Open Dialog"
        }

    }

    //Dialog
    Rectangle {
         id: myDialog

         property Item text: dialogText

         width: 300
         height: 200
         anchors {
             centerIn: parent
         }
         color: "lightgray"
         border.width: 3

         signal closed
         signal opened
         function forceClose() {
             if(myDialog.opacity != 0){
                 myDialog.closed();
                 myDialog.opacity = 0;
             }
         }

         function show() {
             myDialog.opened();
             myDialog.opacity = 1;
         }

         opacity: 0 //default hide
         visible: opacity > 0
         Behavior on opacity {
             NumberAnimation { duration: 1000 }
         }

         Text {
             anchors.centerIn: parent;
             text: "I'm a Dialog"
         }

         MouseArea {
             anchors.fill: parent;
             onClicked: parent.forceClose();
         }
     }

}


Tuesday, September 17, 2013

Set color interactively with hsla(hue, saturation, lightness, alpha)

The example set background color interactively with hsla(hue, saturation, lightness, alpha).

qml example: hsla(hue, saturation, lightness, alpha)

import QtQuick 2.0

Rectangle {
    width: 360
    height: 360
    Text {
        anchors.centerIn: parent
        text: "Hello World"
    }

    /*
        hsla ( real hue, real saturation, real lightness, real alpha )
        Returns a color with the specified hue, saturation, lightness
        and alpha components. All components should be in the range 0-1
        inclusive.
    */
    color: Qt.hsla(
               mySliderHandleHue.x/(mySliderHandleHue.parent.width - 30),
               mySliderHandleSaturation.x/(mySliderHandleSaturation.parent.width - 30),
               mySliderHandleLightness.x/(mySliderHandleLightness.parent.width - 30),
               1)

    Rectangle {
        id: mySliderLightness

        anchors {
            left: parent.left
            right: parent.right
            bottom: parent.bottom
            leftMargin: 20
            rightMargin: 20
            bottomMargin: 10
        }

        height: 20
        radius: 10
        smooth: true
        gradient: Gradient {
            GradientStop { position: 0.0; color: "white" }
            GradientStop { position: 1.0; color: "gray" }
        }

        Rectangle {
            id: mySliderHandleLightness
            x: 1; y: 1; width: 30; height: 20
            radius: 10
            smooth: true
            color: Qt.hsla(0, 0, 1, 1)

            MouseArea {
                anchors.fill: parent
                drag.target: parent
                drag.axis: Drag.XAxis
                drag.minimumX: 0
                drag.maximumX: parent.parent.width - 30
            }
        }
    }

    Rectangle {
        id: mySliderSaturation

        anchors {
            left: parent.left
            right: parent.right
            bottom: mySliderLightness.top
            leftMargin: 20
            rightMargin: 20
            bottomMargin: 10
        }

        height: 20
        radius: 10
        smooth: true
        gradient: Gradient {
            GradientStop { position: 0.0; color: "white" }
            GradientStop { position: 1.0; color: "gray" }
        }

        Rectangle {
            id: mySliderHandleSaturation
            x: 1; y: 1; width: 30; height: 20
            radius: 10
            smooth: true
            color: Qt.hsla(0, 1, 0, 1)

            MouseArea {
                anchors.fill: parent
                drag.target: parent
                drag.axis: Drag.XAxis
                drag.minimumX: 0
                drag.maximumX: parent.parent.width - 30
            }
        }
    }

    Rectangle {
        id: mySliderHue

        anchors {
            left: parent.left
            right: parent.right
            bottom: mySliderSaturation.top
            leftMargin: 20
            rightMargin: 20
            bottomMargin: 10
        }

        height: 20
        radius: 10
        smooth: true
        gradient: Gradient {
            GradientStop { position: 0.0; color: "white" }
            GradientStop { position: 1.0; color: "gray" }
        }

        Rectangle {
            id: mySliderHandleHue
            x: 1; y: 1; width: 30; height: 20
            radius: 10
            smooth: true
            color: Qt.hsla(1, 0, 0, 1)

            MouseArea {
                anchors.fill: parent
                drag.target: parent
                drag.axis: Drag.XAxis
                drag.minimumX: 0
                drag.maximumX: parent.parent.width - 30
            }
        }
    }
}


Set color interactively with rgba(red, green, blue, alpha)

The example set background color interactively with rgba(red, green, blue, alpha).

qml example: rgba(red, green, blue, alpha)

import QtQuick 2.0

Rectangle {
    width: 360
    height: 360
    Text {
        anchors.centerIn: parent
        text: "Hello World"
    }

    /*
        rgba( real red, real green, real blue, real alpha )
        Returns a color with the specified red, green, blue and alpha
        components. All components should be in the range 0-1 inclusive.
    */
    color: Qt.rgba(
               mySliderHandleRed.x/(mySliderHandleRed.parent.width - 30),
               mySliderHandleGreen.x/(mySliderHandleGreen.parent.width - 30),
               mySliderHandleBlue.x/(mySliderHandleBlue.parent.width - 30),
               1)

    Rectangle {
        id: mySliderBlue

        anchors {
            left: parent.left
            right: parent.right
            bottom: parent.bottom
            leftMargin: 20
            rightMargin: 20
            bottomMargin: 10
        }

        height: 20
        radius: 10
        smooth: true
        gradient: Gradient {
            GradientStop { position: 0.0; color: "white" }
            GradientStop { position: 1.0; color: "gray" }
        }

        Rectangle {
            id: mySliderHandleBlue
            x: 1; y: 1; width: 30; height: 20
            radius: 10
            smooth: true
            color: "blue"

            MouseArea {
                anchors.fill: parent
                drag.target: parent
                drag.axis: Drag.XAxis
                drag.minimumX: 0
                drag.maximumX: parent.parent.width - 30
            }
        }
    }

    Rectangle {
        id: mySliderGreen

        anchors {
            left: parent.left
            right: parent.right
            bottom: mySliderBlue.top
            leftMargin: 20
            rightMargin: 20
            bottomMargin: 10
        }

        height: 20
        radius: 10
        smooth: true
        gradient: Gradient {
            GradientStop { position: 0.0; color: "white" }
            GradientStop { position: 1.0; color: "gray" }
        }

        Rectangle {
            id: mySliderHandleGreen
            x: 1; y: 1; width: 30; height: 20
            radius: 10
            smooth: true
            color: "green"

            MouseArea {
                anchors.fill: parent
                drag.target: parent
                drag.axis: Drag.XAxis
                drag.minimumX: 0
                drag.maximumX: parent.parent.width - 30
            }
        }
    }

    Rectangle {
        id: mySliderRed

        anchors {
            left: parent.left
            right: parent.right
            bottom: mySliderGreen.top
            leftMargin: 20
            rightMargin: 20
            bottomMargin: 10
        }

        height: 20
        radius: 10
        smooth: true
        gradient: Gradient {
            GradientStop { position: 0.0; color: "white" }
            GradientStop { position: 1.0; color: "gray" }
        }

        Rectangle {
            id: mySliderHandleRed
            x: 1; y: 1; width: 30; height: 20
            radius: 10
            smooth: true
            color: "red"

            MouseArea {
                anchors.fill: parent
                drag.target: parent
                drag.axis: Drag.XAxis
                drag.minimumX: 0
                drag.maximumX: parent.parent.width - 30
            }
        }
    }
}

Thursday, September 5, 2013

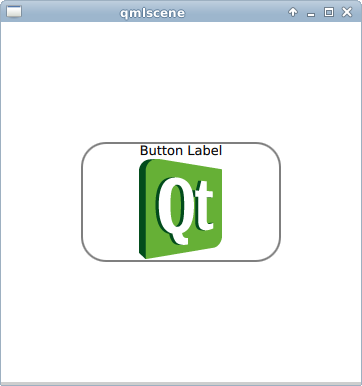
qml example: make gradient color

Example to make gradient color on button.
make gradient color on button


import QtQuick 2.0

Rectangle {
    width: 360
    height: 360

    Rectangle {
        id: myButton

        width: 200
        height: 120
        radius: 25
        anchors.centerIn: parent

        property color buttonColor: "white"
        property color buttonColorPressed: "gray"
        property color buttonBorderColor: "gray"
        property color buttonBorderColorPressed: "black"

        signal signalMe(string action)
        onSignalMe: console.log(action)

        MouseArea{
            id: myButtonMouseArea
            anchors.fill: parent

            onClicked: myButton.signalMe("Clicked")
            onPressed: myButton.signalMe("Pressed")
            onReleased: myButton.signalMe("Released")
        }

        /* pure color, change with mouse pressed
        color: myButtonMouseArea.pressed
               ? buttonColorPressed : buttonColor
        */

        /* gradient color, no change with mouse pressed
        gradient: Gradient {
            GradientStop { position: 0.0; color: "black" }
            GradientStop { position: 1.0; color: "gray" }
        }*/

        //gradient color, changed with mouse pressed
        gradient: Gradient {
            GradientStop {
                position: 0.0;
                color: myButtonMouseArea.pressed ? "black" : "gray" }
            GradientStop {
                position: 1.0;
                color: myButtonMouseArea.pressed ? "gray" : "white" }
        }

        border.width: 2
        border.color: myButtonMouseArea.pressed
                      ? buttonBorderColorPressed : buttonBorderColor

        Text{
            id: buttonLabel
            anchors {
                horizontalCenter: parent.horizontalCenter
                top: parent.top
            }
            color: "black"
            text: "Button Label"
        }

        Image {
            id: buttonImage
            source: "http://goo.gl/kdbgF8"
            anchors {
                horizontalCenter: parent.horizontalCenter
                top: buttonLabel.bottom
            }
        }
    }
}


qml button step-by-step

qml example: Created rounded Rectangle with radius

Use radius: xx to make rounded Rectangle.

example:
qml example: Created rounded Rectangle with radius


import QtQuick 2.0

Rectangle {
    width: 360
    height: 360

    Rectangle {
        id: myButton

        width: 200
        height: 120
        radius: 25
        anchors.centerIn: parent

        property color buttonColor: "white"
        property color buttonColorPressed: "gray"
        property color buttonBorderColor: "gray"
        property color buttonBorderColorPressed: "black"

        signal signalMe(string action)
        onSignalMe: console.log(action)

        MouseArea{
            id: myButtonMouseArea
            anchors.fill: parent

            onClicked: myButton.signalMe("Clicked")
            onPressed: myButton.signalMe("Pressed")
            onReleased: myButton.signalMe("Released")
        }

        color: myButtonMouseArea.pressed
               ? buttonColorPressed : buttonColor

        border.width: 2
        border.color: myButtonMouseArea.pressed
                      ? buttonBorderColorPressed : buttonBorderColor

        Text{
            id: buttonLabel
            anchors {
                horizontalCenter: parent.horizontalCenter
                top: parent.top
            }
            color: "black"
            text: "Button Label"
        }

        Image {
            id: buttonImage
            source: "http://goo.gl/kdbgF8"
            anchors {
                horizontalCenter: parent.horizontalCenter
                top: buttonLabel.bottom
            }
        }
    }
}


qml button step-by-step

Wednesday, September 4, 2013

qml example: implement custom signal and signal handler

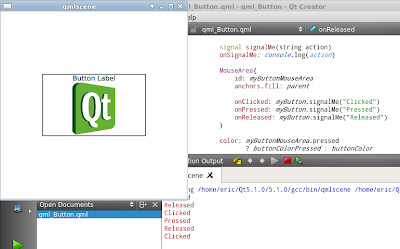
In last qml example of "handle events for button", the MouseArea emit a clicked signal when the user clicks within the mouse area, and then the onClicked signal handler, declared within the MouseArea, will be invoked.

In this post we will create our own signal (signalMe) and signal handler (onSignalMe) to do something.

An object can be notified through a signal handler whenever it a particular signal is emitted. A signal handler is declared with the syntax on<signal> where <signal> is the name of the signal, with the first letter capitalized. The signal handler must be declared within the definition of the object that emits the signal, and the handler should contain the block of JavaScript code to be executed when the signal handler is invoked. ~ refer QML Object Attributes.

implement custom signal and signal handler

import QtQuick 2.0

Rectangle {
    width: 360
    height: 360

    Rectangle {
        id: myButton

        width: 200
        height: 120
        anchors.centerIn: parent

        property color buttonColor: "white"
        property color buttonColorPressed: "gray"
        property color buttonBorderColor: "gray"
        property color buttonBorderColorPressed: "black"

        signal signalMe(string action)
        onSignalMe: console.log(action)

        MouseArea{
            id: myButtonMouseArea
            anchors.fill: parent

            onClicked: myButton.signalMe("Clicked")
            onPressed: myButton.signalMe("Pressed")
            onReleased: myButton.signalMe("Released")
        }

        color: myButtonMouseArea.pressed
               ? buttonColorPressed : buttonColor

        border.width: 2
        border.color: myButtonMouseArea.pressed
                      ? buttonBorderColorPressed : buttonBorderColor

        Text{
            id: buttonLabel
            anchors {
                horizontalCenter: parent.horizontalCenter
                top: parent.top
            }
            color: "black"
            text: "Button Label"
        }

        Image {
            id: buttonImage
            source: "http://goo.gl/kdbgF8"
            anchors {
                horizontalCenter: parent.horizontalCenter
                top: buttonLabel.bottom
            }
        }
    }
}


qml button step-by-step

Tuesday, September 3, 2013

qml example: handle events for button

qml example: handle events for button

To handle events on button, simple handle onClicked:, onPressed:, onReleased:... inside MouseArea.
import QtQuick 2.0

Rectangle {
    width: 360
    height: 360

    Rectangle {
        id: myButton

        width: 200
        height: 120
        anchors.centerIn: parent

        property color buttonColor: "white"
        property color buttonColorPressed: "gray"
        property color buttonBorderColor: "gray"
        property color buttonBorderColorPressed: "black"

        MouseArea{
            id: myButtonMouseArea
            anchors.fill: parent

            onClicked: console.log("Button Clicked")
            onPressed: console.log("Button Pressed")
            onReleased: console.log("Button Released")
        }

        color: myButtonMouseArea.pressed
               ? buttonColorPressed : buttonColor

        border.width: 2
        border.color: myButtonMouseArea.pressed
                      ? buttonBorderColorPressed : buttonBorderColor

        Text{
            id: buttonLabel
            anchors {
                horizontalCenter: parent.horizontalCenter
                top: parent.top
            }
            color: "black"
            text: "Button Label"
        }

        Image {
            id: buttonImage
            source: "http://goo.gl/kdbgF8"
            anchors {
                horizontalCenter: parent.horizontalCenter
                top: buttonLabel.bottom
            }
        }
    }
}

In this example, the MouseArea will emit a clicked signal when the user clicks within the mouse area, and then the onClicked signal handler, declared within the MouseArea, will be invoked.

qml button step-by-step