Qt are now offering a 20% discount on the Qt Advanced Exams to those who take the Qt Essentials Exam before the end of 2010.
Qt Essentials:
To become a Nokia Certified Qt Developer, you must pass the Qt Essentials examination. Programming skills and hands-on development experience with Qt are necessary to pass the exam.
Source: http://qt.nokia.com/developer/learning/news/learning-events/20-discount-off-qt-certification-exams
Sunday, December 5, 2010
Tuesday, November 9, 2010
Qt 4.7.1 and Qt Mobility 1.1.0 released
An upgrade to Qt, Qt 4.7.1, and the final release of Qt Mobility 1.1.0 were released today. Both are now available for download.
Qt 4.7.1
Qt 4.7.1 is a patch release that addresses several minor issues present in Qt 4.7.0. It also introduces OpenGL support for Symbian.
To download it, visit http://get.qt.nokia.com
Qt Mobility 1.1.0
Qt Mobility 1.1.0 has reached final release. Qt Mobility 1.1.0 is the latest version of Qt Mobility, a collection of APIs and frameworks oriented towards mobile application development.
Qt Mobility 1.1.0 contains new Qt APIs, a number of enhancements to existing APIs, QML bindings for relevant APIs and support for the MeeGo platform. The new APIs include Organizer, Versit/Organizer, Document Gallery and Feedback.
In terms of API enhancements, the Location API has been extended with a Maps and Navigation API and camera functionality has been added to the Multimedia API. In addition, the Service Framework API now has support for IPC based service invocation.
Qt Mobility 1.1.0 also contains support for the MeeGo platform.
Read more about Qt Mobility at http://qt.nokia.com/products/qt-addons/mobility
Source and more details: http://blog.qt.nokia.com/2010/11/09/qt-4-7-1-and-qt-mobility-1-1-0-released/
Wednesday, October 20, 2010
Qt for Symbian - Developing in Qt Creator
How to create a small Qt-based Symbian application in Qt Creator - running it on Windows, compiling for the phone and running on the phone.
Saturday, October 16, 2010
Qt Quick Demos in Qt Creator
Demonstration of how to import Qt Quick projects and showing off the nice QML demos included in Qt 4.7
Wednesday, October 6, 2010
Qt SDK 2010.05.1 for Linux released
The now released Qt SDK 2010.05.1 for Linux is only available for x86 (32-bit) and x86_64 (64-bit) Linux environments. This version include GTK style plugin, it make Qt to have look native on Gnome.
Source: http://labs.qt.nokia.com/2010/10/06/qt-sdk-2010-05-1-for-linux-released/
Source: http://labs.qt.nokia.com/2010/10/06/qt-sdk-2010-05-1-for-linux-released/
On Linux/Unix, you need to make the file executable in order to run it. You can either do this with your desktop's file manager or, at the command line, type:
chmod u+x qt-sdk-linux-x86-opensource-2010.05.1.bin
You should now be able to execute the file as normal. You can do this from the command line by typing:
./qt-sdk-linux-x86-opensource-2010.05.1.bin
Sunday, October 3, 2010
Security announcement - Qt Creator 2.0.0 for desktop platforms
A vulnerability has been found in Qt Creator 2.0.0 and previous versions. The vulnerability occurs because of an insecure manipulation of a Unix environment variable by the "qtcreator" shell script. It manifests by causing Qt or Qt Creator to attempt to load certain library names from the current working directory.
This could cause certain Unix shared libraries to be loaded by Qt Creator from the current working directory. The issue does not affect Windows or Mac OS X. It also does not affect the most recent Qt Creator 2.0.1 release.
The issue has been assigned the identifier CVE-2010-3374. See http://cve.mitre.org/cgi-bin/cvename.cgi?name=CVE-2010-337
Recommendation
To nullify any risk posed by this issue, we recommend users of Qt Creator 2.0.0 or earlier upgrade to the most recent release, Qt 2.0.1. It can be downloaded from get.qt.nokhttp://www.blogger.com/img/blank.gifia.com
Users unable to upgrade at this time can replace their "qtcreator" scripts
with the qtcreator.bin binary found in the package distribution, or with the updated script found in the public Qt Creator repository.
The link to the updated script is: http://www.qt.gitorious.org/qt-creator/qt-creator/blobs/3c00715c8e90c57953ec4a8716110f6954e524e4/bin/qtcreator
Source: http://qt.nokia.com/about/news/security-announcement-qt-creator-2.0.0-for-desktop-platforms
Saturday, September 25, 2010
Qt: Locale not supported on X server
After installed new Nokia Qt SDK 1.0.1/Qt 4.7.0 on Ubuntu 10.04, I tried to run my first application on emulator. The error message "Qt: Locale not supported on X server" was shown on Application Output.
As my understanding, it's because the X server cannot understand the language of the locale setting; depends on what the default LANG setting. It can be ignored, English will be used as locale language.
If you really want to remove the error message, you can change your locale setting:
edit file /etc/default/locale with root's right
$sudo gedit locale
replace the LANG setting with:
LANG="en_US.UTF8"
And re-start your system to make it take effect.
Friday, September 24, 2010
Introduction to the QML language
QtCreator 2.0.1 already comes with a full-blown QML text editor and integration of the qmlviewer.
Introduction to the QML language
Introduction to the QML language
QML is a declarative language designed to describe the user interface of a program: both what it looks like, and how it behaves. In QML, a user interface is specified as a tree of objects with properties.
This introduction is meant for those with little or no programming experience. JavaScript is used as a scripting language in QML, so you may want to learn a bit more about it (JavaScript: The Definitive Guide) before diving deeper into QML. It's also helpful to have a basic understanding of other web technologies like HTML and CSS, but it's not required.
Thursday, September 23, 2010
Qt 4.7.0 now available
You can download source and binary packages for Qt 4.7.0 (and binaries for the corresponding Qt SDK 2010.05) from the Qt Download Page. Alternatively, you can grab the source directly from the public repository, where the “v4.7.0″ tag matches the released packages. You can also check out the Qt 4.7 documentation.
Tuesday, September 14, 2010
Nokia Qt SDK 1.0.1 released
Nokia Qt SDK 1.0.1 is released, the focus has been on quality and bug fixing rather than adding new features.
Nokia Qt SDK web site
Description
The Nokia Qt SDK leverages the power of the Qt framework and tools, combining them with tools designed to streamline the creation of apps for Symbian and the Maemo platform.
The SDK includes the Qt Simulator, which enables apps for Symbian and Maemo devices to be tested on a computer.
Wednesday, August 25, 2010
Qt Creator 2.0.1 Released
Nokia today released version 2.0.1 of Qt Creator: the cross-platform integrated development environment (IDE) for use with the Qt framework. Qt Creator 2.0.1 brings bugfixes and optimizations based on feedback received from users since the release of Qt Creator 2.0.0.
Source: Qt Creator 2.0.1 Released — Qt - A cross-platform application and UI framework
Sunday, July 18, 2010
QMessageBox with decision making
QMessageBox can also be used to show information to the user, and the user have to make a decision; such as the confirm to quit dialog.
- Create one more button on the form using Qt Designer. Right click on the button and select Go to Slot...

- Select clicked()

- Add the code

- Create one more button on the form using Qt Designer. Right click on the button and select Go to Slot...

- Select clicked()

- Add the code
    QString text = QObject::tr("Are you sure to quit?");
    QMessageBox msgBox(QObject::tr("Quit"), text, QMessageBox::Warning, QMessageBox::Yes|QMessageBox::Default, QMessageBox::No|QMessageBox::Escape, QMessageBox::NoButton);
    if (msgBox.exec() == QMessageBox::Yes)
    {
        close();
    }

Friday, July 9, 2010
Simple QMessageBox
In the last exercise "A simple PushButton to quit, built as a Qt Gui Application", the app was generate in Qt Designer without any coding. The signal from the button was connected to close() directly. In this exercise, we will have our slot to display a MessageBox before exit.
In Qt Designed, right click on the button and select Go to Slot...

Select clicked(), and click OK.

The method of MainWindow::on_pushButton_clicked() will be generated automatically.
Insert the code:

Save, Build and Run the application.

In Qt Designed, right click on the button and select Go to Slot...

Select clicked(), and click OK.

The method of MainWindow::on_pushButton_clicked() will be generated automatically.
Insert the code:
void MainWindow::on_pushButton_clicked()
{
QMessageBox msgBox;
msgBox.setText("It's going to Quit!");
msgBox.exec();
}

Save, Build and Run the application.

Thursday, July 8, 2010
Qt Creator 2.0 Manual
Qt Creator provides integrated tools for both application designers and developers to create applications for multiple desktop and mobile device platforms.
For application designers, Qt Creator provides an integrated visual editor, Qt Designer, that you can use to design and develop application user interfaces.
For application developers, Qt Creator provides a cross-platform, complete integrated development environment (IDE) that is available for Linux, Mac OS X and Windows operating systems.
Qt Creator 2.0 Manual
Wednesday, July 7, 2010
A simple PushButton to quit, built as a Qt Gui Application
It have almost the same function of "A simple PushButton to quit" (start from empty Qt project), built as a Qt Gui Aplication, using Qt Designer.
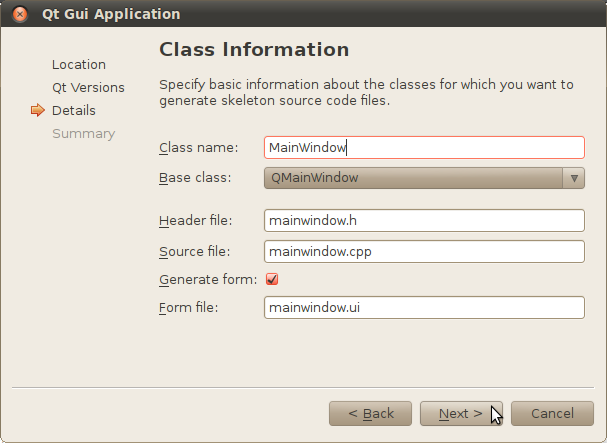
- In Qt Creator, NEW a project by clicking on the File from the menu, then select New File or Project...
- Select Qt C++ Project in Projects on the left, and Qt Gui Application on the right, click Choose.

- Enter name and location of the project, then click Next, Next, Next and Finish.


Qt Creator will open the GUI in Design mode.
Place UI element
- Drag a Push Button on the main window, double click to edit the text, "Quit".

Specify Signal and Slot
- Click on the Edit Signals/Slots icon or press F4 to switch to Edit Signals/Slots mode.

- Pull a connection from the Push Button onto the background.

- A Configure Connection dialog will be opened. Click to show signals and slots inherited from QWidget. Select clicked() signal from pushButton, and close() slot from MainWindow, then click OK.

Now you can save, build and run your application.

A simple PushButton to quit

#include <QtGui>

int main(int argc, char* argv[])
{
QApplication app(argc, argv);

QWidget* mainwindow = new QWidget();
QPushButton* buttonQuit = new QPushButton("Quit", mainwindow);

QVBoxLayout* mainlayout = new QVBoxLayout();
mainlayout->addWidget(buttonQuit);

QObject::connect(buttonQuit, SIGNAL(clicked()), &app, SLOT(quit()));

mainwindow->setLayout(mainlayout);
mainwindow->show();
return app.exec();
}
This is a qmake-base project start from a Empty Qt Project. All jobs are done in software coding. In the next article "A simple PushButton to quit, built as a Qt Gui Application", it will be shown that how to do the same by starting from a Qt Gui Application.
Tuesday, July 6, 2010
Define custom signals and slots
Same effect of the last exercise "signals and slots". In this exercise we create a new class, InterClass, with custom signals and slots. In main.cpp, the emited signals will be sent to the InterClass and re-direct to the receiver.

create a new class, InterClass.
interclass.h
interclass.cpp
main.cpp

create a new class, InterClass.
interclass.h
#ifndef INTERCLASS_H
#define INTERCLASS_H

#include <QtGui>
#include <QObject>

class InterClass : public QObject
{
    Q_OBJECT
public:
    explicit InterClass(QObject *parent, QSlider *slider, QSpinBox *spinBox);

signals:
    void spinBoxValueChanged(int value);
    void sliderValueChanged(int value);
public slots:
    void setValue(int value);

private:
    QSlider *parentSlider;
    QSpinBox *parentSpinBox;

};

#endif // INTERCLASS_H
interclass.cpp
#include <QtGui>
#include "interclass.h"

InterClass::InterClass(QObject *parent, QSlider *slider, QSpinBox *spinBox) :
    QObject(parent)
{
    parentSlider = slider;
    parentSpinBox = spinBox;
    QObject::connect(this, SIGNAL(sliderValueChanged(int)), parentSpinBox, SLOT(setValue(int)));
    QObject::connect(this, SIGNAL(spinBoxValueChanged(int)), parentSlider, SLOT(setValue(int)));
}

void InterClass::setValue(int value)
{
    if((QObject::sender()) == parentSlider){
        emit sliderValueChanged(value);
    }
    else{
        emit spinBoxValueChanged(value);
    }
}
main.cpp
#include <QtGui>
#include "interclass.h"

int main(int argc, char* argv[])
{
    QApplication app(argc, argv);

    QWidget* mainwindow = new QWidget();
    QVBoxLayout* mainlayout = new QVBoxLayout();

    QSlider* slider = new QSlider(Qt::Horizontal, mainwindow);
    slider->setRange(0, 100);

    QSpinBox* spinBox = new QSpinBox(mainwindow);
    spinBox->setRange(0, 100);

    InterClass* interClass =  new InterClass(mainwindow, slider, spinBox);

    QObject::connect(slider, SIGNAL(valueChanged(int)), interClass, SLOT(setValue(int)));
    QObject::connect(spinBox, SIGNAL(valueChanged(int)), interClass, SLOT(setValue(int)));

    mainlayout->addWidget(slider);
    mainlayout->addWidget(spinBox);

    mainwindow->setLayout(mainlayout);
    mainwindow->show();
    return app.exec();
}
signals and slots
In the last exercise "Slider and SpinBox", the slider and spinBox have no relationship at all. Here, we are going to add connect between them. When any one of the slider and the spinBox value changed, it will send a SLOT of valueChanged to the SLOT of the other, and update its value.

next: Define custom signals and slots

#include <QtGui>

int main(int argc, char* argv[])
{
    QApplication app(argc, argv);

    QWidget* mainwindow = new QWidget();
    QVBoxLayout* mainlayout = new QVBoxLayout();

    QSlider* slider = new QSlider(Qt::Horizontal, mainwindow);
    slider->setRange(0, 100);

    QSpinBox* spinBox = new QSpinBox(mainwindow);
    spinBox->setRange(0, 100);

    QObject::connect(slider, SIGNAL(valueChanged(int)), spinBox, SLOT(setValue(int)));
    QObject::connect(spinBox, SIGNAL(valueChanged(int)), slider, SLOT(setValue(int)));

    mainlayout->addWidget(slider);
    mainlayout->addWidget(spinBox);

    mainwindow->setLayout(mainlayout);
    mainwindow->show();
    return app.exec();
}
next: Define custom signals and slots
Slider and SpinBox

#include <QtGui>

int main(int argc, char* argv[])
{
  QApplication app(argc, argv);

  QWidget* mainwindow = new QWidget();
  QVBoxLayout* mainlayout = new QVBoxLayout();

  QSlider* slider = new QSlider(Qt::Horizontal, mainwindow);
  slider->setRange(0, 100);

  QSpinBox* spinBox = new QSpinBox(mainwindow);
  spinBox->setRange(0, 100);


  mainlayout->addWidget(slider);
  mainlayout->addWidget(spinBox);

  mainwindow->setLayout(mainlayout);
  mainwindow->show();
  return app.exec();
}
QVBoxLayout and QHBoxLayout in Qt
Here is a example of using QVBoxLayout and QHBoxLayout.

main.cpp

main.cpp
#include <QtGui>

int main(int argc, char* argv[])
{
    QApplication app(argc, argv);

    QWidget* mainwindow = new QWidget();
    QVBoxLayout* mainlayout = new QVBoxLayout();

    QLabel* label1 = new QLabel("label 1", mainwindow);
    QTextEdit* textedit1 = new QTextEdit(mainwindow);
    QPushButton* pushbutton1 = new QPushButton("PushButton 1", mainwindow);
    QVBoxLayout* layout1 = new QVBoxLayout();
    layout1->addWidget(label1);
    layout1->addWidget(textedit1);
    layout1->addWidget(pushbutton1);

    QLabel* label2 = new QLabel("label 2", mainwindow);
    QTextEdit* textedit2 = new QTextEdit(mainwindow);
    QPushButton* pushbutton2 = new QPushButton("PushButton 2", mainwindow);
    QHBoxLayout* layout2 = new QHBoxLayout();
    layout2->addWidget(label2);
    layout2->addWidget(textedit2);
    layout2->addWidget(pushbutton2);


    mainwindow->setLayout(mainlayout);
    mainlayout->addLayout(layout1);
    mainlayout->addLayout(layout2);

    mainwindow->show();
    return app.exec();
}
Sunday, July 4, 2010
Using Qt Creator to create qmake-base project
- Start Qt Creator
- Click File -> New File or Project...
- Select Other Project from the Projects box on the left, and Empty Qt Project from the box on thr right. Then click Choose...

- Enter the name and location of the project, then click Next, and Next.and Finish.


Now, you can see a empty project without any source code inside.

- Click File -> New File or Project...again
- Select C++ from the Files and Classes box on the left, and C++ Source File from the box on the right, and click Choose...

- Enter the name of the file, ex. main.cpp, and click Next, and Finish.


Enter the code into the file main.cpp.

Save All, and Run (by clicking on the green arrow button, or Ctrl+R key)

- Click File -> New File or Project...
- Select Other Project from the Projects box on the left, and Empty Qt Project from the box on thr right. Then click Choose...

- Enter the name and location of the project, then click Next, and Next.and Finish.


Now, you can see a empty project without any source code inside.

- Click File -> New File or Project...again
- Select C++ from the Files and Classes box on the left, and C++ Source File from the box on the right, and click Choose...

- Enter the name of the file, ex. main.cpp, and click Next, and Finish.


Enter the code into the file main.cpp.
#include
#include

int main(int argc, char *argv[])
{
QApplication app(argc, argv);
QLabel *label = new QLabel("Hello World Qt!");
label->show();
return app.exec();
}

Save All, and Run (by clicking on the green arrow button, or Ctrl+R key)

Compile cpp code using qmake in command line
Create the source code helloqt.cpp, in folder ~/QtPrj/helloqt
Start a Terminal, type the commands:
$qmake -project
$qmake helloqt.pro
$make
and Run the output file:
$./helloqt


#include <QApplication>
#include <QtGui>

int main(int argc, char *argv[])
{
QApplication app(argc, argv);
QLabel *label = new QLabel("Hello World Qt!");
label->show();
return app.exec();
}
Start a Terminal, type the commands:
$qmake -project
$qmake helloqt.pro
$make
and Run the output file:
$./helloqt


Install Qt on Ubuntu Linux
There are two ways to install Qt on Ubuntu
I) The most update Qt can be download from http://qt.nokia.com/
Download from http://qt.nokia.com/downloads
after downloaded, change the permission to executable
open a Terminal, switch to the download location and type the command:
$./qt-sdk-linux-x86-opensource-2010.04.bin
Using dowdload version to install Qt, it will not configure the path for you. You may have errors when use qmake in command line; such as "QApplication: No such file or directory". If you always use the IDE version, it's no any problem.
To uninstall, start a Terminal, switch to the bin folder of the installed location, ex. ~/qtsdk-2010.04/bin/, run the command:
$./uninstall

II) Install via Ubuntu Software Center
Start Ubuntu Software Center from Application of Ubuntu top menu, search and select Qt Creator, and click Install.
After installed, it will configure the path for you, so you can use qmake in command line. But it's not the most update version.
To uninstall, start Ubuntu Software Center, and click Remove button of Qt Creator.

Thursday, July 1, 2010
eLearning modules based on Qt Training materials
It's a series of eLearning modules based on Qt Training materials, cover selected topics of the Qt Essentials training courses. These modules will help you learn the essentials of Qt.
One of the video : Fundamentals of Qt - Your first Qt application
One of the video : Fundamentals of Qt - Your first Qt application
Qt Creator 2.0 exercise: up/down counter - III/3 : Add the code
Add a variable in header
- Click Edit on the left menu, select to edit mainwindow.h
- Add a valiable counterValue under class MainWindow

Add our Slots:
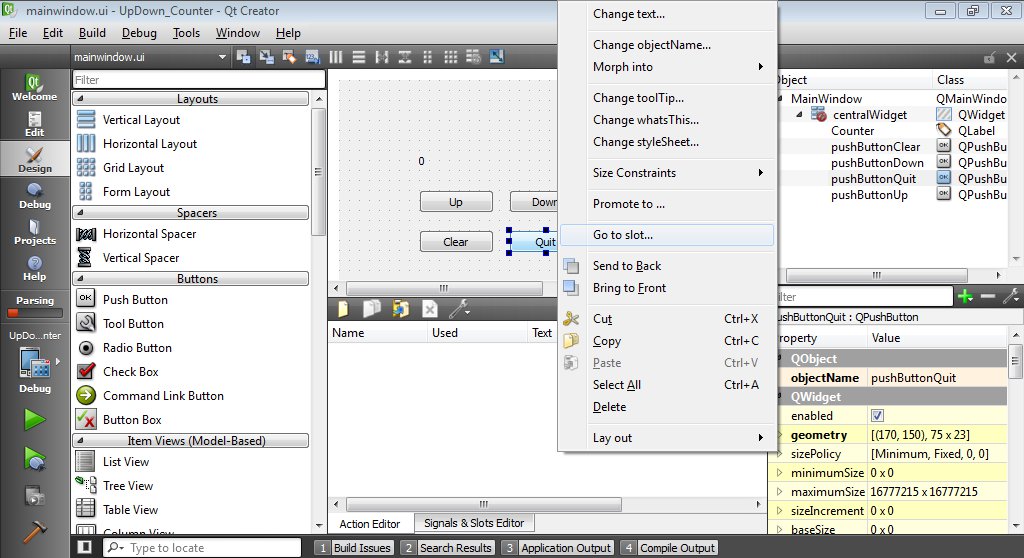
- Double click on mainwindow.ui, to switch back to Design mode.
- Click the Edit Signals/Slots icon on top bar(or F4)
- Drag a mouse on any empty space on the mainwindow to call out the Configure Connection.

- Click Edit on the right to add new slots.

- Click on the "+" under the Slots box, add new slots, and click OK.
slotClearButtonClicked()
slotUpButtonClicked()
slotDownButtonClicked()

- Click Cancel to finish Configure Connection.
Make connections from signals to slots
- With Edit Signals/Slots enabled, drag from the button Up.

- Select clicked() on the left and slotUpButtonClicked() on the right.

- Repeat to make connection on Down button to slotDownButtonClicked(), Clear button to slotClearButtonClicked().

- Save All, and Rebuild All.
- After Rebuild, in Design mode, with Edit Widgets enabled (F3), right click and button of Up/Down/Clear and select Go to Slot... The code of the slot will be added in mainwindow.cpp, and it will be opened in Edit mode.


Repeat to add the code for all of the four slots(include Quit button).
Add the Code:
- Open mainwindow.cpp in Edit mode
- Scroll down to the new added code for the slots.
- Add the code as:

- Save All and Build All and Run.
Now we have all the basic function implemented.

- Click Edit on the left menu, select to edit mainwindow.h
- Add a valiable counterValue under class MainWindow
int counterValue;

Add our Slots:
- Double click on mainwindow.ui, to switch back to Design mode.
- Click the Edit Signals/Slots icon on top bar(or F4)
- Drag a mouse on any empty space on the mainwindow to call out the Configure Connection.

- Click Edit on the right to add new slots.

- Click on the "+" under the Slots box, add new slots, and click OK.
slotClearButtonClicked()
slotUpButtonClicked()
slotDownButtonClicked()

- Click Cancel to finish Configure Connection.
Make connections from signals to slots
- With Edit Signals/Slots enabled, drag from the button Up.

- Select clicked() on the left and slotUpButtonClicked() on the right.

- Repeat to make connection on Down button to slotDownButtonClicked(), Clear button to slotClearButtonClicked().

- Save All, and Rebuild All.
- After Rebuild, in Design mode, with Edit Widgets enabled (F3), right click and button of Up/Down/Clear and select Go to Slot... The code of the slot will be added in mainwindow.cpp, and it will be opened in Edit mode.

Repeat to add the code for all of the four slots(include Quit button).
Add the Code:
- Open mainwindow.cpp in Edit mode
- Scroll down to the new added code for the slots.
- Add the code as:
void MainWindow::on_pushButtonClear_clicked()
{
  counterValue = 0;
  ui->Counter->setText(QString().setNum(counterValue));
}

void MainWindow::on_pushButtonUp_clicked()
{
  counterValue++;
  ui->Counter->setText(QString().setNum(counterValue));
}

void MainWindow::on_pushButtonDown_clicked()
{
  counterValue--;
  ui->Counter->setText(QString().setNum(counterValue));
}

void MainWindow::on_pushButtonQuit_clicked()
{
  close();
}

- Save All and Build All and Run.
Now we have all the basic function implemented.

Subscribe to:
Comments (Atom)