Sunday, July 18, 2010

QMessageBox with decision making

QMessageBox can also be used to show information to the user, and the user have to make a decision; such as the confirm to quit dialog.

- Create one more button on the form using Qt Designer. Right click on the button and select Go to Slot...


- Select clicked()


- Add the code

QString text = QObject::tr("Are you sure to quit?");
QMessageBox msgBox(QObject::tr("Quit"), text, QMessageBox::Warning, QMessageBox::Yes|QMessageBox::Default, QMessageBox::No|QMessageBox::Escape, QMessageBox::NoButton);
if (msgBox.exec() == QMessageBox::Yes)
{
close();
}


QMessageBox with decision making

Friday, July 9, 2010

Simple QMessageBox

In the last exercise "A simple PushButton to quit, built as a Qt Gui Application", the app was generate in Qt Designer without any coding. The signal from the button was connected to close() directly. In this exercise, we will have our slot to display a MessageBox before exit.

In Qt Designed, right click on the button and select Go to Slot...


Select clicked(), and click OK.


The method of MainWindow::on_pushButton_clicked() will be generated automatically.

Insert the code:

void MainWindow::on_pushButton_clicked()
{
QMessageBox msgBox;
msgBox.setText("It's going to Quit!");
msgBox.exec();
}


Save, Build and Run the application.

Thursday, July 8, 2010

Qt Creator 2.0 Manual


Qt Creator provides integrated tools for both application designers and developers to create applications for multiple desktop and mobile device platforms.

For application designers, Qt Creator provides an integrated visual editor, Qt Designer, that you can use to design and develop application user interfaces.

For application developers, Qt Creator provides a cross-platform, complete integrated development environment (IDE) that is available for Linux, Mac OS X and Windows operating systems.

Qt Creator 2.0 Manual

Wednesday, July 7, 2010

A simple PushButton to quit, built as a Qt Gui Application

It have almost the same function of "A simple PushButton to quit" (start from empty Qt project), built as a Qt Gui Aplication, using Qt Designer.

- In Qt Creator, NEW a project by clicking on the File from the menu, then select New File or Project...
- Select Qt C++ Project in Projects on the left, and Qt Gui Application on the right, click Choose.


- Enter name and location of the project, then click Next, Next, Next and Finish.


Qt Creator will open the GUI in Design mode.

Place UI element
- Drag a Push Button on the main window, double click to edit the text, "Quit".


Specify Signal and Slot
- Click on the Edit Signals/Slots icon or press F4 to switch to Edit Signals/Slots mode.


- Pull a connection from the Push Button onto the background.


- A Configure Connection dialog will be opened. Click to show signals and slots inherited from QWidget. Select clicked() signal from pushButton, and close() slot from MainWindow, then click OK.


Now you can save, build and run your application.

A simple PushButton to quit

A simple PushButton to quit

#include <QtGui>

int main(int argc, char* argv[])
{
QApplication app(argc, argv);

QWidget* mainwindow = new QWidget();
QPushButton* buttonQuit = new QPushButton("Quit", mainwindow);

QVBoxLayout* mainlayout = new QVBoxLayout();
mainlayout->addWidget(buttonQuit);

QObject::connect(buttonQuit, SIGNAL(clicked()), &app, SLOT(quit()));

mainwindow->setLayout(mainlayout);
mainwindow->show();
return app.exec();
}


This is a qmake-base project start from a Empty Qt Project. All jobs are done in software coding. In the next article "A simple PushButton to quit, built as a Qt Gui Application", it will be shown that how to do the same by starting from a Qt Gui Application.

Tuesday, July 6, 2010

Define custom signals and slots

Same effect of the last exercise "signals and slots". In this exercise we create a new class, InterClass, with custom signals and slots. In main.cpp, the emited signals will be sent to the InterClass and re-direct to the receiver.

custom signals and slots

create a new class, InterClass.

interclass.h

#ifndef INTERCLASS_H
#define INTERCLASS_H

#include <QtGui>
#include <QObject>

class InterClass : public QObject
{
Q_OBJECT
public:
explicit InterClass(QObject *parent, QSlider *slider, QSpinBox *spinBox);

signals:
void spinBoxValueChanged(int value);
void sliderValueChanged(int value);
public slots:
void setValue(int value);

private:
QSlider *parentSlider;
QSpinBox *parentSpinBox;

};

#endif // INTERCLASS_H


interclass.cpp

#include <QtGui>
#include "interclass.h"

InterClass::InterClass(QObject *parent, QSlider *slider, QSpinBox *spinBox) :
QObject(parent)
{
parentSlider = slider;
parentSpinBox = spinBox;
QObject::connect(this, SIGNAL(sliderValueChanged(int)), parentSpinBox, SLOT(setValue(int)));
QObject::connect(this, SIGNAL(spinBoxValueChanged(int)), parentSlider, SLOT(setValue(int)));
}

void InterClass::setValue(int value)
{
if((QObject::sender()) == parentSlider){
emit sliderValueChanged(value);
}
else{
emit spinBoxValueChanged(value);
}
}


main.cpp

#include <QtGui>
#include "interclass.h"

int main(int argc, char* argv[])
{
QApplication app(argc, argv);

QWidget* mainwindow = new QWidget();
QVBoxLayout* mainlayout = new QVBoxLayout();

QSlider* slider = new QSlider(Qt::Horizontal, mainwindow);
slider->setRange(0, 100);

QSpinBox* spinBox = new QSpinBox(mainwindow);
spinBox->setRange(0, 100);

InterClass* interClass = new InterClass(mainwindow, slider, spinBox);

QObject::connect(slider, SIGNAL(valueChanged(int)), interClass, SLOT(setValue(int)));
QObject::connect(spinBox, SIGNAL(valueChanged(int)), interClass, SLOT(setValue(int)));

mainlayout->addWidget(slider);
mainlayout->addWidget(spinBox);

mainwindow->setLayout(mainlayout);
mainwindow->show();
return app.exec();
}


signals and slots

In the last exercise "Slider and SpinBox", the slider and spinBox have no relationship at all. Here, we are going to add connect between them. When any one of the slider and the spinBox value changed, it will send a SLOT of valueChanged to the SLOT of the other, and update its value.


#include <QtGui>

int main(int argc, char* argv[])
{
QApplication app(argc, argv);

QWidget* mainwindow = new QWidget();
QVBoxLayout* mainlayout = new QVBoxLayout();

QSlider* slider = new QSlider(Qt::Horizontal, mainwindow);
slider->setRange(0, 100);

QSpinBox* spinBox = new QSpinBox(mainwindow);
spinBox->setRange(0, 100);

QObject::connect(slider, SIGNAL(valueChanged(int)), spinBox, SLOT(setValue(int)));
QObject::connect(spinBox, SIGNAL(valueChanged(int)), slider, SLOT(setValue(int)));

mainlayout->addWidget(slider);
mainlayout->addWidget(spinBox);

mainwindow->setLayout(mainlayout);
mainwindow->show();
return app.exec();
}


next: Define custom signals and slots


Slider and SpinBox

Slider and SpinBox


#include <QtGui>

int main(int argc, char* argv[])
{
QApplication app(argc, argv);

QWidget* mainwindow = new QWidget();
QVBoxLayout* mainlayout = new QVBoxLayout();

QSlider* slider = new QSlider(Qt::Horizontal, mainwindow);
slider->setRange(0, 100);

QSpinBox* spinBox = new QSpinBox(mainwindow);
spinBox->setRange(0, 100);


mainlayout->addWidget(slider);
mainlayout->addWidget(spinBox);

mainwindow->setLayout(mainlayout);
mainwindow->show();
return app.exec();
}

QVBoxLayout and QHBoxLayout in Qt

Here is a example of using QVBoxLayout and QHBoxLayout.

QVBoxLayout and QHBoxLayout in Qt

main.cpp

#include <QtGui>

int main(int argc, char* argv[])
{
QApplication app(argc, argv);

QWidget* mainwindow = new QWidget();
QVBoxLayout* mainlayout = new QVBoxLayout();

QLabel* label1 = new QLabel("label 1", mainwindow);
QTextEdit* textedit1 = new QTextEdit(mainwindow);
QPushButton* pushbutton1 = new QPushButton("PushButton 1", mainwindow);
QVBoxLayout* layout1 = new QVBoxLayout();
layout1->addWidget(label1);
layout1->addWidget(textedit1);
layout1->addWidget(pushbutton1);

QLabel* label2 = new QLabel("label 2", mainwindow);
QTextEdit* textedit2 = new QTextEdit(mainwindow);
QPushButton* pushbutton2 = new QPushButton("PushButton 2", mainwindow);
QHBoxLayout* layout2 = new QHBoxLayout();
layout2->addWidget(label2);
layout2->addWidget(textedit2);
layout2->addWidget(pushbutton2);


mainwindow->setLayout(mainlayout);
mainlayout->addLayout(layout1);
mainlayout->addLayout(layout2);

mainwindow->show();
return app.exec();
}


Sunday, July 4, 2010

Using Qt Creator to create qmake-base project

- Start Qt Creator
- Click File -> New File or Project...
- Select Other Project from the Projects box on the left, and Empty Qt Project from the box on thr right. Then click Choose...


- Enter the name and location of the project, then click Next, and Next.and Finish.


Now, you can see a empty project without any source code inside.


- Click File -> New File or Project...again
- Select C++ from the Files and Classes box on the left, and C++ Source File from the box on the right, and click Choose...


- Enter the name of the file, ex. main.cpp, and click Next, and Finish.


Enter the code into the file main.cpp.

#include
#include

int main(int argc, char *argv[])
{
QApplication app(argc, argv);
QLabel *label = new QLabel("Hello World Qt!");
label->show();
return app.exec();
}


Save All, and Run (by clicking on the green arrow button, or Ctrl+R key)

Compile cpp code using qmake in command line

Create the source code helloqt.cpp, in folder ~/QtPrj/helloqt

#include <QApplication>
#include <QtGui>

int main(int argc, char *argv[])
{
QApplication app(argc, argv);
QLabel *label = new QLabel("Hello World Qt!");
label->show();
return app.exec();
}


Start a Terminal, type the commands:

$qmake -project

$qmake helloqt.pro

$make

and Run the output file:

$./helloqt


Install Qt on Ubuntu Linux

There are two ways to install Qt on Ubuntu

I) The most update Qt can be download from http://qt.nokia.com/

Download from http://qt.nokia.com/downloads

after downloaded, change the permission to executable

open a Terminal, switch to the download location and type the command:
$./qt-sdk-linux-x86-opensource-2010.04.bin

Using dowdload version to install Qt, it will not configure the path for you. You may have errors when use qmake in command line; such as "QApplication: No such file or directory". If you always use the IDE version, it's no any problem.

To uninstall, start a Terminal, switch to the bin folder of the installed location, ex. ~/qtsdk-2010.04/bin/, run the command:
$./uninstall


Qt Creator 2.0.0 installed from download version

II) Install via Ubuntu Software Center

Start Ubuntu Software Center from Application of Ubuntu top menu, search and select Qt Creator, and click Install.

After installed, it will configure the path for you, so you can use qmake in command line. But it's not the most update version.

To uninstall, start Ubuntu Software Center, and click Remove button of Qt Creator.


Qt Creator 1.3.1 installed via Ubuntu Software Center

Thursday, July 1, 2010

eLearning modules based on Qt Training materials

It's a series of eLearning modules based on Qt Training materials, cover selected topics of the Qt Essentials training courses. These modules will help you learn the essentials of Qt.


One of the video : Fundamentals of Qt - Your first Qt application

Qt Creator 2.0 exercise: up/down counter - III/3 : Add the code

Add a variable in header

- Click Edit on the left menu, select to edit mainwindow.h

- Add a valiable counterValue under class MainWindow


int counterValue;


Add our Slots:

- Double click on mainwindow.ui, to switch back to Design mode.

- Click the Edit Signals/Slots icon on top bar(or F4)

- Drag a mouse on any empty space on the mainwindow to call out the Configure Connection.


- Click Edit on the right to add new slots.


- Click on the "+" under the Slots box, add new slots, and click OK.
slotClearButtonClicked()
slotUpButtonClicked()
slotDownButtonClicked()


- Click Cancel to finish Configure Connection.

Make connections from signals to slots

- With Edit Signals/Slots enabled, drag from the button Up.


- Select clicked() on the left and slotUpButtonClicked() on the right.


- Repeat to make connection on Down button to slotDownButtonClicked(), Clear button to slotClearButtonClicked().


- Save All, and Rebuild All.

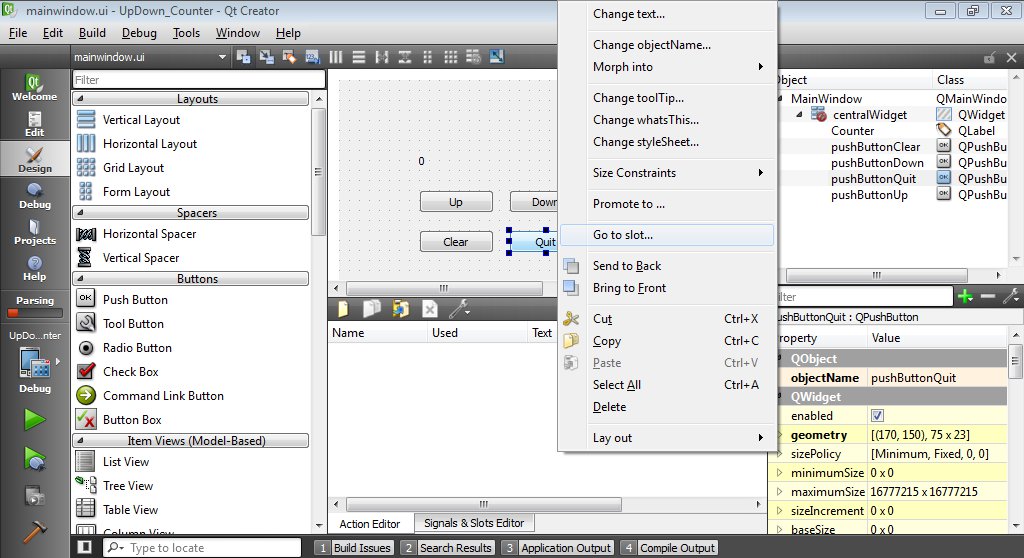
- After Rebuild, in Design mode, with Edit Widgets enabled (F3), right click and button of Up/Down/Clear and select Go to Slot... The code of the slot will be added in mainwindow.cpp, and it will be opened in Edit mode.


Repeat to add the code for all of the four slots(include Quit button).

Add the Code:

- Open mainwindow.cpp in Edit mode

- Scroll down to the new added code for the slots.

- Add the code as:


void MainWindow::on_pushButtonClear_clicked()
{
counterValue = 0;
ui->Counter->setText(QString().setNum(counterValue));
}

void MainWindow::on_pushButtonUp_clicked()
{
counterValue++;
ui->Counter->setText(QString().setNum(counterValue));
}

void MainWindow::on_pushButtonDown_clicked()
{
counterValue--;
ui->Counter->setText(QString().setNum(counterValue));
}

void MainWindow::on_pushButtonQuit_clicked()
{
close();
}

Add the code

- Save All and Build All and Run.

Now we have all the basic function implemented.
Run on emulator

Qt Creator 2.0 exercise: up/down counter - II/3 : Add Quit function

Following the last article "Qt Creator 2.0 exercise: up/down counter - I : New the application and place UI elements", the Quit function of the application will be implemented here.

In Design Mode, click on the Edit Signals/Slots icon on the top menu, or press F4.


Move mouse over the Quit button, press and hold the left button of the mouse, and drag it to any empty space of the window pane.


Click to select "Show signals and slots inherited from QWidget", select clicked() on the left box, and close() on the right box, click OK.


You can note the window pane is updated with the added signal/slot.


Save All, and Run the application.
Now you can quit the application by clicking on the Quit button.