Monday, July 27, 2009

Qt Creator 1.2.1 and Updated Qt SDK Released

Oslo, 14 July 2009 – Qt Software today issued a bug fix release for Qt Creator – the new cross-platform Qt integrated development environment. This release addresses an issue with Qt Creator's debugging tools, among other fixes based on feedback gathered since the Qt Creator 1.2.0 release. For a detailed overview, please refer to the changes file at http://www.qtsoftware.com/developer/changes/changes-qtcreator-1.2.1.

Qt Creator 1.2.1 is available for download either standalone, or as part of an updated build of the Qt SDK (2009.03_01) from http://www.qtsoftware.com/downloads.


Source>>

Wednesday, July 8, 2009

Exercise: drawImage

In this exercise, simple show a picture using drawImage().


Create a Qt4 GUI Application, download the picture and save in the project directory, named "qtman.jpg".


Modify mainwindow.h and mainwindow.cpp

#ifndef MAINWINDOW_H
#define MAINWINDOW_H

#include <QtGui/QMainWindow>

namespace Ui
{
class MainWindow;
}

class MainWindow : public QMainWindow
{
Q_OBJECT

public:
MainWindow(QWidget *parent = 0);
~MainWindow();

private:
Ui::MainWindow *ui;
void paintEvent(QPaintEvent*);
};

#endif // MAINWINDOW_H


mainwindow.h


#include "mainwindow.h"
#include "ui_mainwindow.h"
#include <QPainter>

MainWindow::MainWindow(QWidget *parent)
: QMainWindow(parent), ui(new Ui::MainWindow)
{
ui->setupUi(this);
}

MainWindow::~MainWindow()
{
delete ui;
}

void MainWindow::paintEvent(QPaintEvent *event)
{
QImage image("qtman.jpg");
QRect rect(0, 0, image.width(), image.height()); //define the area used to display
QPainter painter(this);

painter.drawImage(rect, image);
}
mainwindow.cpp

Sunday, July 5, 2009

Exercise: Color Changer

In this example, I will create a Qt4 GUI Application to change color inside a rectangle using three slider.


Create a new Qt4 GUI Application in Qt Creator.

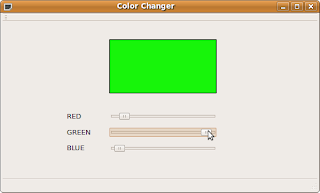
Use Qt Designer to edit mainwindow.ui, add three Horizontal Slider, named redSlider, greenSlider and blueSlider and place them as the picture.

Set QAbstractSlider>maximum to 255.


Modify mainwindow.h and mainwindow.cpp

#ifndef MAINWINDOW_H
#define MAINWINDOW_H

#include <QtGui/QMainWindow>

namespace Ui
{
class MainWindow;
}

class MainWindow : public QMainWindow
{
Q_OBJECT

public:
MainWindow(QWidget *parent = 0);
~MainWindow();

private:
Ui::MainWindow *ui;
void paintEvent(QPaintEvent*);

int r, g, b;

private slots:
void rChanged(int);
void gChanged(int);
void bChanged(int);

};

#endif // MAINWINDOW_H
mainwindow.h


#include "mainwindow.h"
#include "ui_mainwindow.h"
#include <QPainter>

MainWindow::MainWindow(QWidget *parent)
: QMainWindow(parent), ui(new Ui::MainWindow)
{
r = g = b = 0;
ui->setupUi(this);

connect(ui->redSlider, SIGNAL(valueChanged(int)),
this, SLOT(rChanged(int)));

connect(ui->greenSlider, SIGNAL(valueChanged(int)),
this, SLOT(gChanged(int)));

connect(ui->blueSlider, SIGNAL(valueChanged(int)),
this, SLOT(bChanged(int)));

}

MainWindow::~MainWindow()
{
delete ui;
}

void MainWindow::rChanged(int tr)
{
r = tr;
update();
}

void MainWindow::gChanged(int tg)
{
g = tg;
update();
}

void MainWindow::bChanged(int tb)
{
b = tb;
update();
}

void MainWindow::paintEvent(QPaintEvent *event)
{
QRect rect(200, 50, 200, 100);
QPainter painter(this);
painter.setRenderHint(QPainter::Antialiasing, true);
painter.setPen(QPen(Qt::black, 1, Qt::SolidLine, Qt::RoundCap));
painter.setBrush(QBrush(QColor::QColor(r, g, b, 255),
Qt::SolidPattern));


painter.drawRect(rect);
}


mainwindow.cpp

Save ALL, Re-build and Run, it should be work.

Friday, July 3, 2009

Qt for Mac on Cocoa in Plain English


Qt Software Engineer Trenton Schulz talks about new support for 64-bit Qt apps on top of Apple's Cocoa framework.

GUI Hello World: Add the code

Finally, add some code to the source, to make it work.

Add a slot to mainwindow.h

private slots: void buttonClicked();


#ifndef MAINWINDOW_H
#define MAINWINDOW_H

#include <QtGui/QMainWindow>

namespace Ui
{
class MainWindow;
}

class MainWindow : public QMainWindow
{
Q_OBJECT

public:
MainWindow(QWidget *parent = 0);
~MainWindow();

private:
Ui::MainWindow *ui;

private slots:
void buttonClicked();

};

#endif // MAINWINDOW_H

mainwindow.h

Modify mainwindow.cpp to implement buttonClicked() and connect with okButton signal clicked().


#include "mainwindow.h"
#include "ui_mainwindow.h"

MainWindow::MainWindow(QWidget *parent)
: QMainWindow(parent), ui(new Ui::MainWindow)
{
ui->setupUi(this);

connect(ui->okButton, SIGNAL(clicked()), this, SLOT(buttonClicked()));
}

void MainWindow::buttonClicked()
{ ui->label_Hello->setText("Hello:" + ui->lineEdit_Name->text());
}


MainWindow::~MainWindow()
{
delete ui;
}

mainwindow.cpp

Save All, Build and Run again.


prev. -> GUI Hello World: Create GUI using Qt Designer

Thursday, July 2, 2009

GUI Hello World: Create GUI using Qt Designer

Now, I will create a GUI using Qt Designer.

To involve Qt Designer, right click mainwindow.ui, select Open With > and click Qt Designer.


Drag a Label from the Widget Box on the left side bar to the MainWindow.

And change the text to "who are you?", and change ObjectName field on the right side bar to label_WhoAreYou.

Drag a Line Edit to MainWindow, and change ObjectName to lineEdit_Name.

Drag a Push Button in MainWindow, change the text to OK, ObjectName to okButton.
Drag a Label to MainWindows, change the text to "I'm Qt", Object Name to label_Hello, and also change the alignment->Horizontal property to AlignHCenter.

Select the label_WhoAreYou and Line Edit, and click the Lay Out Horizontally button on the top tool bar.

Select all widgets, and click the Lay Out Vertically button on the top tool bar.

Finally, adjust the size of the window as you want, save and close Qt Design.

Now you can re-build in Qt Creator, the output window will be like it:


prev. -> GUI Hello World: Creat a dummy GUI Qt Application using Qt Ceator 1.2.0
next -> GUI Hello World: Add the code


Qt Designer


Qt Designer is Qt's tool for designing and building graphical user interfaces (GUIs) from Qt components. You can compose and customize your widgets or dialogs in a what-you-see-is-what-you-get (WYSIWYG) manner, and test them using different styles and resolutions.

Widgets and forms created with Qt Designer integrated seamlessly with programmed code, using Qt's signals and slots mechanism, that lets you easily assign behavior to graphical elements. All properties set in Qt Designer can be changed dynamically within the code. Furthermore, features like widget promotion and custom plugins allow you to use your own components with Qt Designer.

If you are new to Qt Designer, you can take a look at the Getting To Know Qt Designer document. For a quick tutorial on how to use Qt Designer, refer to A Quick Start to Qt Designer.

Source: Qt 4.5: Qt Designer Manual

Wednesday, July 1, 2009

GUI Hello World: Creat a dummy GUI Qt Application using Qt Ceator 1.2.0

- Start Qt Creator by clicking Applications->Programming->QtCreator on the menu bar. (Ubuntu 9.04)

The start-up page will be displayed.

- Creat a new project by clicking File->New


Then you can select what type of file you want to creat, select Projects and Qt4 Gui Application.


And enter your project name and location.


As a dummy application, you can accept the default setting.


After finished, a project with and some files will be created for you. include the project file HelloQtCreator.pro, source file main.cpp and mainwindow.cpp, header file mainwindow.h, and mainwindow.ui.


Click the Run button (with green arrow) on the left bar.


If no error, the dummy application will be run.

It's the first GUI Application Qt Creator prepare for you. Just a empty window without anything. Anyway, it's a complete GUI Application.

next -> GUI Hello World: Create GUI using Qt Designer